
Just a note: we have not died or fallen off the world. But, it is summer and things are very busy for both of us. Hope your first few official days of summer have been splendid. It has been quite beautiful here the last couple of days and my DH is out there digging in the dirt like a 3-year old!!
So why the title “Quasi-mood-o?” You may recall that I was working on a vest called Vintage Mood. It is a cute vest with a big problem. A Quasimoto problem! Several knitters complained about the hump at the base of the back of the neck. I myself described this problem when I first posted about the project. A fellow Raveler read my post and asked me what I had done to fix this. I told her my plan, though I had not actually completed the repair. I did so last night and thought I would share it.
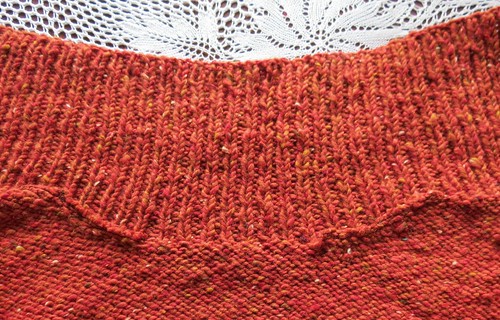
Upon examination, my Vintage Mood had ~3 inches of excess fabric at the base of the neck. Unfortunately I did not get a picture of the hump before the fix, but you can see a smaller “pouch” here. I thought through what was needed and came up with a step-by-step solution:
Step 1.
Put on the garment and mark the width of the back neck edge. Count these sts and make sure they are centered to the center back neck.
Step 2.
Pinch the “hump” together to see exactly how much extra fabric you need to get rid of — probably 2-3 inches. Measure down from the collar and mark the row at that depth.

Step 3.
Take the number of sts from #1 above and divide in half. Center these sts to the center back neck. Place a piece of waste yarn through these sts (I used knitting needles). The markers in the ribbing above are lined up with the first and last live sts that they will be grafted to to make sure the centers are lined up.
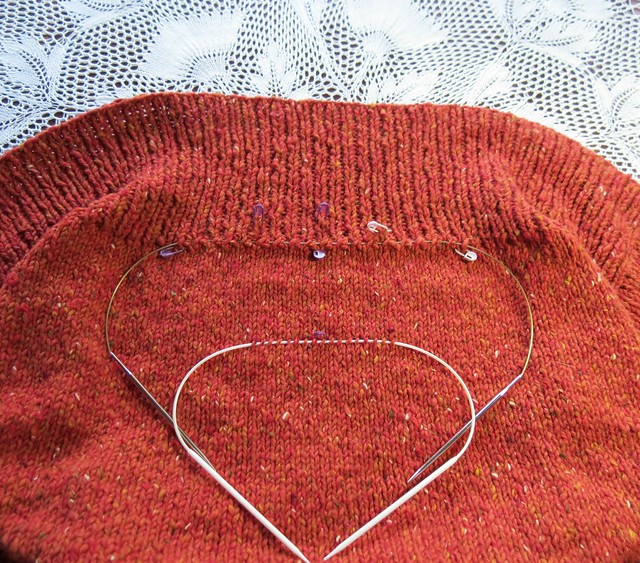
Step 4.
Snip the yarn below the ribbing and place the sts between the neck markers on a holder. Snip the yarn from the row above the sts on the piece of waste yarn (#2) in the middle — pull the ends out through all the held sts from the center until these sts are held by the waste yarn or needles alone.

Step 5.
Using waste yarn, “draw” outline where the collar needs to be sewn down on either side of the center sts (shown in green below).

At this point I cut the excess fabric down the middle to make it easier to work.
Step 6.
Graft/sew the body of the vest back to the neck — make sure to line up the live sts center to center with the neckband sts. Ease the area that is being sewn to the live neck sts. I grafted as stockinette on the body sts and ribbing on the collar sts.The distance along the green waste yarn is much longer than the number of sts in the collar would accommodate so I really had to pull it in to make it work.
Step 7.
Machine stitch along the inside edge (along the sewing line in Step 6) and then cut away the excess fabric. When stitching, be sure to stitch down the cut yarn ends from Steps 3 and 4.
Okay, that sounded easy enough…but when I got done, there were little pointy areas located at the spots marked as the neck width in Step 1. It seems that I should have gone beyond the very back neck, farther into the front. SO, I just machine stitched little darts on the inside and cut the points away. At some point you say enough is enough!!
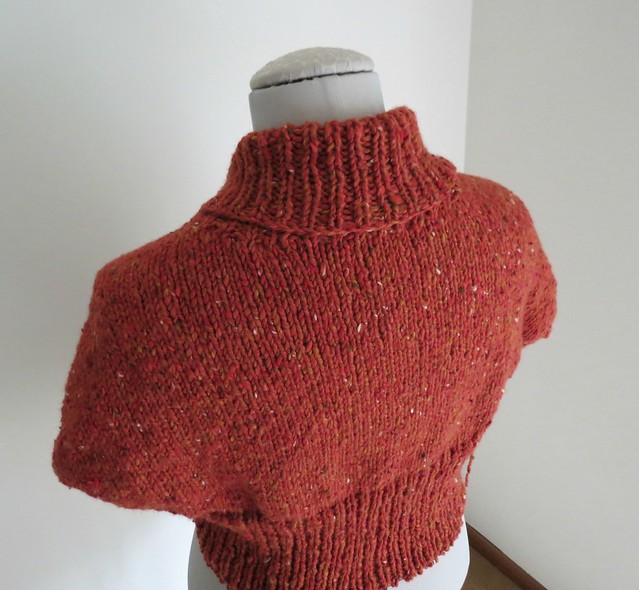
The result? Quasimoto has left the building!!
PS: Julie asked if I would be able to describe what should be done while KNITTING the vest to fix the “hump” problem. As I responded to her, I do not have the mental energy or motivation to try to figure out the changes that would be necessary in the pattern to fix this. I think this is something the designer should be expected to do. Maybe this is not a problem shared by everyone, but it does seem to apply to many and maybe warrants a re-look on her part…but mine is done and I do not have the desire or will to spend more time on it!!
PS to the PS — check out the comment from Sivani about using short rows to fix the problem. She put in a lot of detail. If anyone uses her method, let me know!
PS2: Trudy called me “fearless” but I am not. This is a very expendable project — if it worked, great. If not, no big deal. The outcome did not matter one way or the other.


Sally’s Solution.
Step 1: Call Susan, complain bitterly.
Step 2: Listen to Susan’s ingenious instructions on how to fix. Nod knowingly over phone.
Step 3: Throw project into obscure corner of yarn room.
Comment by surly — June 23, 2012 @ 1:37 pm
Um, I’m with Sally. But Susan, you get a bazillion ingenuity points for MacGuyvering that neckline! Nice job!
Comment by Emm — June 23, 2012 @ 2:20 pm
Where were you a month ago!?! I frogged my vintage mood – because of the hump. Sigh…. Your solution is perfect. Well Done.
Comment by ExecutiveKnitter — June 23, 2012 @ 2:44 pm
If I were Sally, my solution would have been to hand it over to you to fix.
Excellent job fixing the problem! When you posted about it before, I wondered why the designer’s sweater looked so nice in the back, when everyone else was having trouble. But when I just looked at the photo again, it looks to me as though there’s a faint line running across the back below the neckline – maybe 1 1/2 to 2 inches below the ribbing, and looking almost as if the stitches had been bound off along there and then later picked up. I wonder if she did some sort of “fix” on hers.
http://images4.ravelrycache.com/uploads/tweedysheep/74412628/IMG_2030__637x800__medium2.jpg
Comment by Cheryl S. — June 23, 2012 @ 3:05 pm
Now that you really understand this, how would you alter the pattern (short rows?) to create this vest with no hump? I want to knit it and I’m not so crazy about knit-surgery. THere must be a way to do this where the stitches you removed are never knit in the first place.
Julie in San Diego
Comment by Julie in San Diego — June 23, 2012 @ 3:34 pm
A+ sweater surgery!
Comment by Ann — June 23, 2012 @ 8:50 pm
That’s just amazing — you are a fearless genius!
Comment by Trudy — June 23, 2012 @ 10:38 pm
Thanks again for your wonderful pictures explaining your surgery. I join Trudy: You are a fearless genius. Charlotte in Germany
Comment by Charlotte — June 25, 2012 @ 3:44 am
Brilliant! Thanks for sharing this, with such great photographs.
Looking at this, and bearing in mind that I don’t currently have the pattern, I would attempt the following (on the size you knit), based on trying to count rows and stitches in your pictures, and your final comment of the extra width required.
No guarantees, but this might help others to try and incorporate the changes during the knitting.
(Use preferred method of shortrowing, e.g. Japanese, Wrap and Turn, etc.)
20 rows before starting the ribbing, locate and mark the center stitch (CM), and 8 sts either side (M). (17 sts in center group)
R 1: K to M, turn (8 sts to CM))
R 2: (and all even rows) P to end
R 3: K to 3 sts before M, turn (11 sts to CM)
R 5: K to 5 sts before M, turn (13 sts to CM)
R 7: K to 7 sts before M, turn (15 sts to CM)
R 9: K to 8 sts before M, turn (16 sts to CM)
R11: K to 9 sts before M, turn (17 sts to CM)
R13: K to 10 sts before M, turn (18 sts to CM)
R15: K to 10 sts before M, turn (18 sts to CM)
R17: K to 11 sts before M, turn (19 sts to CM)
R17: K to 11 sts before M, turn (19 sts to CM)
R19: K to 12 sts before M, turn (20 sts to CM)
R21: K to 12 sts before M, turn (20 sts to CM)
R22: P to end
Do not break yarn!
— End of first side. —
Attach yarn at the other end.
R 1: P to M, turn (8 sts to CM))
R 2: (and all even rows) K to end
R 3: P to 3 sts before M, turn (11 sts to CM)
R 5: P to 5 sts before M, turn (13 sts to CM)
R 7: P to 7 sts before M, turn (15 sts to CM)
R 9: P to 8 sts before M, turn (16 sts to CM)
R11: P to 9 sts before M, turn (17 sts to CM)
R13: P to 10 sts before M, turn (18 sts to CM)
R15: P to 10 sts before M, turn (18 sts to CM)
R17: P to 11 sts before M, turn (19 sts to CM)
R17: P to 11 sts before M, turn (19 sts to CM)
R19: P to 12 sts before M, turn (20 sts to CM)
R21: P to 12 sts before M, turn (20 sts to CM)
R22: K to end
— End of second side —
Return to the edge of the first side, and continue working in pattern (starting rib).
Comment by Sivani — June 25, 2012 @ 3:51 am
I’d say short rows immediately, but your method is probably much faster… anyway, the result is great!
Comment by Luisa — June 25, 2012 @ 8:22 am
Hello, I’m back again. I tried Sivani’s short row solution with my third Vintage mood. There is no hump in the back anymore! I’m very glad. – I’m going to do yr surgery with my two “humpy” finished vests. It seems to be a faster solution, as effective as the short rows.
Happy knitting
Charlotte
Comment by Charlotte — September 12, 2012 @ 4:53 am
Okay, now I want to see a photo of you wearing this. I finished mine, carefully checked the gauge and actually followed the instructions, and it’s way too wide across the shoulders, so it gaps funny in back when I wear it. It’s not the hump problem, because I followed Sivani’s instructions there. I want to see someone else wearing one so I can tell if I need to re-knit the top and graft it onto the bottom…
It’s a quick knit though, so I won’t cry too much if I have to start over. A little, maybe…
Comment by Lisle — December 12, 2012 @ 7:48 pm