theraineysisters knitting and so much more

October 25, 2009

From Sally — Blanket Excuse

Filed under: Knitting Tips,Tweed Baby Blanket — surly @ 12:56 pm

I’m supposed to be doing many things: writing up the Topsy Turvy Moebius Pattern (coming soon), working on my Christmas knitting (is it really almost November?), writing, making my son work on his college essays, cleaning, etc. Instead, I got distracted and knit something that wasn’t on “the list.”

A couple of years ago, some friends had their first baby and I knit them a wonderful fair isle baby blanket. They’re expecting again in early December, and I wasn’t planning on knitting something for the second baby but then I started — as a middle child — to feel a bit guilty. Didn’t this baby deserve a blanket all her own? I didn’t have time to knit one as complicated as the one I’d done the first time, so I made a quick little Tweed Baby Blanket, designed by Jared Flood.

I know they’re expecting a girl, so I hunted in my stash and found two colors of Rowan’s Cash Cotton: purple and pink. Soooo girlie. But those were my daughter’s favorite colors until about the age of five or six, so I figured I couldn’t go too wrong.

Here’s the finished product.

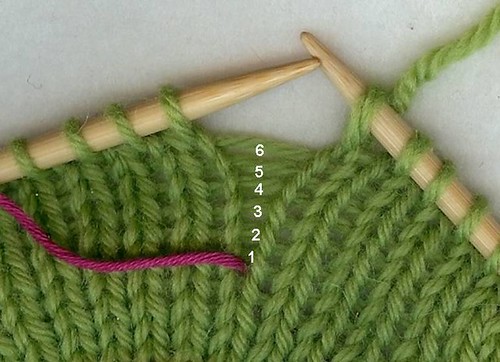
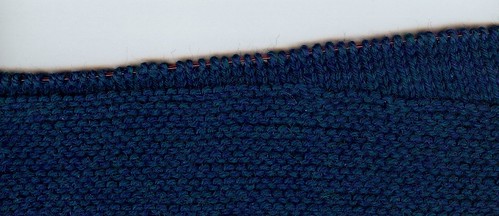
As I often do, I made a slight change to the pattern. This change was necessitated by my crappy knitting. Really. I had finished the blanket and picked up stitches all around it for the border. My pick up was horrible. Truly horrible. See:

Look at that edge. Ghastly. I think the problem was that in order to get the proper drape for the blanket, I used a 7 U.S. needle. That’s fine, but it made the edge floppy. Usually, when I pick up along garter stitch, I pick up in the “nubs,” but that didn’t quite work here because of how many stitches I needed to pick up. I tried to pretend I could live with it, but I couldn’t. I would have been embarrassed to gift this blanket with that sloppy looking edge.

To correct the problem, I picked up my stitches in the blanket fabric. That give me a very nice, firm defined edge. However, doing that kind of pick up means that the pick up is not at all attractive on the wrong side of the blanket. Although this blanket isn’t completely reversible, I wanted it to look nice on both sides.

I purled my first row to better mimic the border’s lace pattern and to disguise the pick up. Then, after knitting two or three rows in stockinette, I took a new ball of yarn and a new needle and picked up all the way around again in the purl bump of my pick up on the wrong side of the blanket.

If you look carefully at those pictures, you can see that I picked up by going from the top of the stitch into the bottom (the opposite of what I would usually do) so that it would look as if I had purled a row. That way, it matched the right side. I then purled several rounds to create stockinette stitch. I now had two stockinette facings surrounding the edge of the blanket.

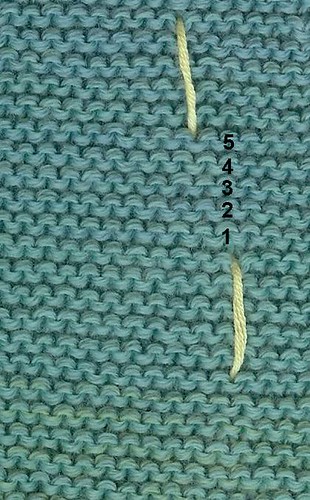
On the next row, I knit the two facings together by putting the needle through one stitch from each facing and then knitting them as one stitch.

This is how it looked when I completed that row:

And here is the wrong side of the completed border.

It’s a nice easy way to create a finished facing. It would work well on a sweater knit in fine yarn.

June 13, 2009

From Sally — A River Runs Through It

Filed under: Knitting Tips,River Run Shawl — Tags: , , — surly @ 11:48 am

For some reason, I like to knit shawls in the summer. Maybe it’s because the yarn feels lighter in my lap than a heavy wool sweater does. In one of our recent posts, I showed a picture of this yarn and accompanying beads:

Today I’ll show what I’m working on. Some of you guessed this was destined to become an Aeolian Shawl, which is a very pretty shawl from Knitty. But that’s not what I’m making. At least not yet. I’m currently knitting the River Run shawl from a kit I bought at the Maryland Sheep and Wool Festival from Just Our Yarn. (I can’t find a photograph of the finished shawl to show you, so you’ll have to wait.)

Lace in progress never looks all that great, but here’s a photo anyway:

The photograph doesn’t really do justice to the richness of the yarn’s color or to its beautiful silk-like sheen. It really is gorgeous yarn. It’s Almaza, which is tencel, not silk. The idea of knitting with tencel gave me pause — but I couldn’t resist the color. It’s a bit tricky to work with. It’s very slippery, and I don’t think it will have much stretch in blocking so I’m knitting it a little more loosely than I ordinarily would so that the openness of the lace pattern will be knitted in rather than blocked out (if that makes sense).

It’s a fairly simple and easy lace pattern because it’s repetitious and very regular. I don’t need any markers to show pattern repeats because of the regularity and because the beads themselves serve as markers.

Simplicity doesn’t mean one can’t make mistakes, though. Somehow, I frakked up one of my yarnovers. See the odd-looking shape in the middle?

Now, I kept noticing it and thinking I’d “deal” with it later. Finally, I realized that it wasn’t going to go away. By that time, I had knitted another 40+ rows. It was late at night and so of course that seemed the perfect time to rip back forty rows. Was I tired? Check. Was it dark? Check. Had I had at least one glass of wine? Check. Yes — the perfect time to rip back forty rows of lace.

After I ripped it back, I had a few moments of panic. It wasn’t quite as easy to ladder back up the yarnovers as I assumed it would be. I felt like Bones in that one Star Trek episode in which he’s transplanting Spock’s brain and forgets how everything is connected partway through. Fortunately, the shawl and I both survived.

It still looks slightly funky, but I’ll even out the yarnovers when I block it. Whew.

April 8, 2009

From Sally — In Vogue?

Filed under: Cathedral,Knitting Tips — surly @ 10:27 am

My mind tends to wander when I knit — often to the next “must have” project. So, when the new issue of Vogue Knitting hit my mailbox, I was excited to flip through it.

Hmmm. Mayhaps a trip to ye olde magazine shoppe is in order. It looks a bit worse for wear. I can’t even read most of the first half.

In the meantime, I’m plugging away on Cathedral. I should have done something slightly differently on the back, which I sort of knew at the time but did nothing about. Le sigh. I have “fixed” it for the front, however. What was my mistake?

Many Japanese patterns that have waist shaping do all of the shaping on one row. Instead of graduated decreases, all stitches will be removed by doing staggered decreases across a row. Later, the stitches will be added back by doing “make ones” in one row. Now, the problem with doing a lot of “make ones” in one row is that each time you increase, you are shortening, and therefore tightening up, the running thread that runs between the stitches. That’s fine if you are doing a few increases here and there. Doing multiple increases on the same row can look a bit off.

In my sweater, I needed to decrease and then increase 20 stitches in the shaping rows. This was charted to be accomplished on the five-stitch reverse stockinette panels that separate the two different patterns. On the decrease row, those five stitches go down to three. On the increase row, you make one, purl three, make one to go back to five. When I did that on the back, you can see where the increases occurred. (In the photo, the double pointed needle points to the line to help you see it better.)

When you look at the piece as a whole, it’s not that noticeable but it bothers me. So, when I did the increases for the front, I changed my technique. On the wrong side row before the increase row, I inserted a yarnover in the middle of each set of three stitches. I did that to increase the amount of running thread I had to work with when I came back to do the increases. On the increase row itself, I worked to the three reverse stockinette stitches. I slipped the first one to the right hand needle so I could “reach” the yarnover. I let the yarnover drop off the needle, and then manipulated the extra yarn so it was spread out over the three stitches. I placed the slipped stitch back on the left hand needle, and then worked the increases. (I hope I am making sense.)

Here is what the increases look like on the front. It’s a bit harder to see b/c the piece is still on the needle, but once it’s finished and blocked there should be no line at all.

April 1, 2009

From Susan — 1-2-3 Addendum

Filed under: Knitting Tips — lv2knit @ 10:16 pm

I’m glad so many of you found my counting tips helpful, though I left out a really important part of the explanation that shows why this method is easier than flipping row counters and marking hash marks after every row.

For the following to make sense (and probably a lot of you already understood what I was trying to say!), you’ll need to read yesterday’s post first.

In the example from yesterday, we are doing sleeve increases every 6 rows and using waste yarn to mark when the increases are done.  Once you have worked 6 rows above the waste yarn, you do the next increase, right?

BUT, how am I supposed to keep track of those 6 rows — by using a row counter or hash marks?  How is that helpful or easier?  This is where your knitting does the work for you.  All you do is count the “ladders” above the waste yarn (i.e., running thread) between sts and you can see when the 6 rows are done and you are ready for the next increase:

St St by you.

On the reverse side, you can count bumps.

Rev St St by you.

With garter stitch, I count ridges.

Garter by you.

So, I do count something — but it’s my knitting that is keeping track for me.

Thanks for putting up with more on this topic!

PS — Jen had this question:

“I wasn’t confused  before, but now I am. If you’re increasing every 6 rows, and count 6 ladders and THEN increase, doesn’t that mean you’re increasing every 7th row? Have I been doing this wrong all along? I thought Increasing every 6 rows meant increasing every sixth row and not having 6 rows between each increase row.”

Jen, you are correct and what I am doing is exactly what you have been doing.  The first ladder is created on the row you actually do the increase = row 1 of the 6 rows in question.  Then you knit 5 plain rounds.  This equals the 6 ladders.  The next row is an increase row again: row 1 of the next 6.

You could move your waste yarn from front to back (or back to front) on the row after you complete the increase, and then work 5 rows plain with the last row of the 6 being the increase row.  I just find it easier to move the waste yarn on the row that I do the thing I am counting, so I don’t forget.

From Susan — Easy as 1-2-3

Filed under: Knitting Tips,Updates — lv2knit @ 12:13 am

Wow — Sally’s new Japanese sweater is a tough act to follow, so I won’t even try.  Her sweater is absolutely stunning, and I can’t wait to see it in person.  I will be doing that soon, as I head east for another foray into the exciting world of the Maryland Sheep and Wool Festival — first weekend in May!!

So, what have I been up to?  I have been working on Sleeve #1 of my Ode to Joy and also doing the prep work for the upcoming knitters guild program.   The sleeve seems particularly slow, even for a sleeve.  Could it be because I need to add 60 rows to obtain the length I need?  Hmmm, maybe. 

Since my knitting life is far more boring than Surly’s, I thought I would share a couple of tricks I have gleaned over the years. 

Counting 1-2-3
Many steps in the knitting process require counting: counting rows between cable crossings, increases, decreases, etc.   This requires keeping track of said counting.  Row counters that have to be turned, hash marks that have to be written down, will all fail you because they rely on you remembering to do something.  Each and every time.  No forgetting.  Ever.  And I have found that I am not reliable!  So I have learned to let my knitting to do the counting for me. 

Your knitting will never lie to you. 

Counting Rows with Waste Yarn
My favorite method for counting rows has been mentioned many times on our blog.  It is one of the best tips of the trade I have ever found (Sally likes it, too).  

Let’s use the example of sleeve increases.  They are done every “x” number of rows.  In our example, let’s say the increases are to be done every 6 rows. 

On the row that you do the first increase, you ** work the increase and knit a few sts.  Place the waste yarn between the stitch you just worked (the last st on the RH needle) and the next one to be worked (1st stitch on the LH needle).  Yep. it just lays there between the two sts.  Now knit the row normally, working the second increase at the end of the row. 

The running thread of the row you just worked will hold the waste yarn in place and counts as one row.  Work 5 more rows.  Now there are 6 rows above the point where the waste yarn was placed.  Since we are doing our increases every 6 rows, it is time to do another increase.  Repeat from **, weaving the waste yarn from front to back, or back to front (this step alternates), on each row that an increase is made.  If I forget to weave the waste yarn — I just pull it through under the running thread on the next row.

Your knitting will look like the sleeve shown here:

Sleeve with markers by you.
Each “slash” represents 2 decreases — here you see 6 decs every 4 ridges and 7 every 5 ridges

I am doing decreases because this is a top down sleeve, but the principle is the same. 

I changed the color of my waste yarn to show where I changed from every 4th to every 5th ridge decs, though this is not really necessary.  I do not remove the waste yarn when I’m done with the first sleeve — it tells the sleeve’s story.  What happens if I get side tracked on a project?  Can’t find my notes?  Put the project away for months (years??!!) and now I want to start the second sleeve?  My waste yarn tells the story.

Counting Increases with Markers
The other thing I do is something I started out of necessity: I really must get distracted easily — like, before I get to the end of the row!    Have you ever forgotten to do the second increase (decrease) on a sleeve?  You eventually count your sts and find out the count is off. 

Where is the missing stitch?  You look carefully along each edge and BINGO.  There it is (or should I say isn’t).  Back about 5 inches on the left hand side of the sleeve!  You have two choices: rip back (ugh) or fudge and add the stitch.  The fudged sleeve will end up a bit funky, and you’ll always know the mistake is there (ugh).   

To avoid this, I use stitch markers to show how many increases (or decreases) I actually did vs how many I was supposed to do.  For a bottom-up sleeve, after a few rows and increases, I place markers to mark off my original sts.  The increases will be on either side of the markers. 

The number of sts on each side of the markers must always be equal and always equal to the number of increases indicated by my waste yarn (3-3-3, 10-10-10…always equal).  I count these sts every so often — if the numbers don’t match, I catch it early and don’t have much ripping to do.

Sleeve by you.

With top down sleeves, you start at the widest point in the sleeve.  The markers show where you will end up and the total number of decreases will be on either side of the markers.  As you work the sleeve decreases, the number of completed decreases (indicated by your waste yarn) plus the remaining sts on each side of the markers, need to equal the total number of decs.

Whew!  This is a lot of writing for a very easy concept.  I hope you find it useful.  I know it has saved me a lot of time, stress, and concentration. 

I can count without counting!    Now you know exactly how lazy I am!!

January 14, 2009

From Sally — A New Bohus

Filed under: Knitting Tips,Large Lace Collar — Tags: , — surly @ 10:49 am

I’ve had the yarn to knit a new Bohus sweater for a long time, and I finally started it. My inspiration for doing so is The American Swedish Institute’s upcoming exhibition, Radiant Knits: The Bohus Tradition. I’ll be traveling to Minnesota (BRRRRRR) next week to visit Susan and go to the exhibit’s opening weekend.

The Bohus now on my needles is the Large Lace Collar, and I’m using one of the kits produced by Solveig Gustafsson. The directions for these authentic Swedish kits have you knit the yoke in the round, and then knit the back, front, and sleeves as flat pieces. I’ve chosen to rewrite the directions to knit the entire garment in the round because I love having the whole sweater finished when it comes off the needles.

As with my Blue Shimmer, I’m going to make some small changes to the design. I’ll do a different neck than the ribbing the pattern calls for. I’m not quite sure yet what that will be, so I started the sweater with a provisional cast on to keep my options open. I’ve just now finished the yoke, which is the slow but fun part. Here are some in progress photos:

As I was about to finish the yoke, I decided to rip back three rows in order to line the patterns up differently. At that point, I had 400+ stitches on my needle and I didn’t want to lose them. (I was on a size 2.5 mm.) So I pulled out the needle, and then used it to pick up the stitches in the row I needed to rip down to. Once the stitches were securely on the needle, I could rip out the rows above it without worrying about losing anything. In case you’ve never done that, here’s a picture of how it looked as I was picking the row up:

It’s a little fussy, but much faster than other ways of doing it. Now that I am in the all black portion of my sweater, I’ve gone down a needle size to a 2.25 mm. The reason for that is in my experience, I knit a little tighter when I’m stranding. If I didn’t change needle sizes now that the sweater is all one color, the knitting would look looser and the sweater might appear to “balloon out” from the yoke.

I’m trying NOT to think about the fact that I am knitting an entire sweater on the size needles I usually use for socks and gloves.

December 7, 2008

From Susan and Sally — Where art thou, Short Rows?

Filed under: Baby Cables and Big Ones too,Knitting Tips — Both Sisters @ 6:15 pm

We had a couple of questions about our Baby Cables project.  Alison asked about the position of our short row shaping, and Deirdre wanted to know more about the neck sizing.  Here goes!

First, why did we add short rows — the pattern does not call for them and the sweater looks great, so why bother?  When trying on the yoke during construction, the back neck clearly wanted to ride at least an inch higher than the front.  We were concerned that this would cause the sweater to pull up in back.  Short rows in a top down sweater need to be added before the split is made for the sleeves to add length to the back neck — adding short rows after the break for the sleeves will add length to the back body.  We wanted to complete the garter stitch section before doing the short rows so they would not disrupt the ridges. 

This diagram shows the placement of the short row turns.  We used Japanese Short Rows, which are described very well by NonaKnits.

And here are Susan’s short rows:

Deirdre asked about the size of the neck opening.  It is relatively large – and somewhat like a boatneck fit.   Susan made hers smaller relative to the size of the pattern by casting on the smallest number of sts and then adjusting the increases accordingly.  Some people like the openness of the neck and would not need to adjust.  By casting on in increments of 8 sts, you can adjust the neck opening as desired as long as you account for the difference in your increases.

From Susan: I did not get as far as I wanted to yesterday and today looks unlikely as well!  Bummer, but chores and holiday activities are cutting into my knitting time!

From Sally:  I am doing some stealth holiday knitting, but still hope to get the second sleeve finished in the next few days.

ETA: Jane asked about our doing short rows on the front. Just to clarify, the short rows are adding length to the back. The “x”s on the front show where the short rows ended — where the turns occur. The short rows are knit completely across the back but only partway across the front as indicated.  We hope the revised diagram is more helpful and descriptive.  Obviously, it only makes sense when you are working from the pattern.

November 30, 2008

From Susan — Something Worked!

Filed under: Back Story,Knitting Tips — lv2knit @ 1:04 pm

When something works, it is an amazing thing, so I thought I would share such an experience.  I don’t know about you, but over the years I have struggled with how to organize my myriad of knitting needles.  Because I like to knit upstairs with other humanoids, a lot of my knitting paraphernalia has migrated to the family room.  This has created aggravation for everyone!

I used to store all my knitting needles, etc. in one large box.  Each size needle had its own labelled zip-lock bag.  This meant that every time I finished using a needle, I would have to hunt for its bag, and place it into the bag.  Do you think this ever happened?  No.  SO, every so often, I would spread the mess out on the floor and “organize” my needles — trying to sort them and place them into their respective bags.  This task was so daunting that it happened very rarely.  It always looked like a knitting bomb went off in our family room.

I knew something had to change — and it did, and it works!  I went to JoAnn Fabrics in search of some kind of drawer system.  My plan was to have a drawer for every 2-3 needles sizes.  I ended up with 4 sizes per drawer:

This drawer system is made for scrapbooking.  The drawers slide out and have an attached, snap on lid.  I thought I would be completely annoyed by the lid, but I love it.  I also wasn’t sure at first how I would like to mix the needles together, but the way I did it works out wonderfully — as I start a new project, I grab the drawer with the likely suspects.  All the needle lengths are there and the next size up or down for swatching.  When I am done using a needle, I just need to put it into the right drawer, which takes a second, vs trying to find one particular baggie.  Because it is so easy, I actually do it!!  Yay!

Every drawer has a needle sizer, so I never have to look for one.  I have one drawer for dpns, and one for all of my random accessories:


The Altoid tins hold pins

The cart rolls out of sight into a closet.   I’m sure many of you developed your own great system far sooner than I, but I am a little slow on the uptake.  All I know is that my system is working, my family room is in control, and I no longer have to listen to people complain about the knitting mess.  Woo Hoo!

I can also share another very small FO.  I made a pair of Fetching Glovelets for my niece for Christmas using less than one skein of Cascade Dolce yarn, Color 959.   These knit up very quickly of course, and make a cute gift:

I’m making another pair in dark blue Dolce and trimmed in silver gray silk for my youngest daughter — last year I made her a pair in butter-soft cashmere, but now she wants her school colors.  Okay, anything you say, Princess! 😉

August 14, 2008

From Susan — Icarus Takes Flight

Filed under: Knitting Tips,Susan's Icarus Shawl — lv2knit @ 9:43 pm

Icarus Shawl on Lettie Front by you.

My Icarus Shawl is done.  I chose it for its beauty and simplicity, but its very simplicity made it a little boring to knit! I did have some fun adding beads a la Mimknits, except I used a crochet hook instead of fishing line.  Mim says that there is a risk of dropping a stitch and having the shawl unravel, but that is really not the case here.  If the bead is placed above a YO, which these are, the stitch cannot unravel.  It will stop at the yarnover and not go further.  I had no trouble using the crochet technique.

Beading
There are to my knowledge three ways to add beads while knitting.  Two require that you thread the beads onto your working yarn ahead of time, and one is done by pulling the stitch through the bead as you go.  These pics show the differences:

The following two methods require pre-threading the beads:

Bead placement occurs between two sts.  The fan effect is created by slipping an increasing number of beads in-between.  Beads are placed on both WS and RS rows —

 amuletbag091006.jpg picture by lv2knit
This pattern is available free: Beaded Amulet Bag Pattern

The next method is also done with slipped beads, but the bead is placed in front of the stitch, replacing the stitch so to speak.  The stitch is slipped as to purl with yarn in front, with the bead positioned on the short strand in front of the stitch:

WeddingPurse007.jpg Wedding Purse picture by lv2knit
This pattern is available free: Beaded Wedding Purse

The last method is the one that Mimknits described above — pulling a stitch through the bead as you go.  Here is a picture of the beads and crochet hook that I used for Icarus.  I think my beads could have been quite a bit larger to have more visual impact:

Blocking
Anyone who has knit lace knows that blocking creates a miracle.  It transforms the lace from a blob to a thing of ethereal and breathtaking beauty.  While knitting lace, it is such an ugly duckling, I throw it on the floor, let the dog lay on it, roll it up and throw it in a corner…but once blocked, I treat it with such reverence!  It becomes a delicate crystal vase that must be carried and handled gingerly — at least for a while!

Here is pre-blocked Icarus:

Icarus Shawl pre-block by you.

The magic of Icarus lies not only in the expected miracle of lace blocking.  There is an intrinsic quality in this pattern that is not apparent as you are knitting it. The routine and repetitive pattern rows become something much, much more in the blocking.  Intricate shapes appear that were not there as you were knitting — really, they weren’t!  For this reason, I highly recommend this pattern for someone’s first lace shawl.  You get a lot of bang for your knitting buck!

Icarus being blocked:

Icarus Shawl lower by you.

The feathers really become feathers!  And now the shawl is something to love!

Icarus Shawl with Peacock by you.

Sally wrote about her Icarus and included a wonderful poem (scroll down to read the poem).  So, now both Rainey Sisters have completed their mandatory Icarus Shawls. 😉

April 20, 2008

From Susan — Shaping Up

Filed under: Knitting Tips,Susan's Mitered Cardigan — lv2knit @ 12:05 pm

I thought I would share a knitting tip that some of you asked about in reference to the Mitered Cardigan I am currently working on — it is still progressing at a snail’s pace (if a small, slimey, armless snail could knit ;)). 

This information can be applied to any knitting project as long as you create graph paper in the appropriate gauge. I use the Actual Size Graph Paper generator.  I know there are others but this one is the best one I have found.  It will allow you to create graph paper of any ratio.

Basically, you draw out the shape you want on the graph paper and then fudge around with the knit shaping to create it.  By “fudging” I mean that the sequencing should make sense to you as a knitter.  For instance, instead of “bind off 5 sts, 3 sts, 4 sts” I would make it “bind off 5 sts, 4 sts, 3 sts” to create the shape, even though either might work with your diagram.

The illustration on the left shows the general sketch for the neck and armhole shaping I used for the Mitered Cardigan.  The red line shows the shaping I was going for and the blue line shows how to recreate the shaping with knitting.  The graph paper shown is not to scale, but gives you the idea.

The picture on the right shows how the final piece matches up with the drawing.  When you use this technique, the knitted piece should follow your outline exactly as long as you use the correct gauge on your graph paper.  It is really cool!

Shaping Diagram

In the case of the Mitered Cardigan, I needed to cast on additional sts to create the shaping, due to the direction of the knitting — shown with yellow arrows.  This is not typical.  Usually, you will be binding off/decreasing sts to create your shaping — the principle is still the same. 

How did I know what the shaping should be in the first place?  For the armhole, I knew the overall width of the body and the width I needed at the shoulders.  The difference between those two numbers had to go!  The neckline is a standard jewel neck: 3-3.5 inches lower than the back.  I made it the same width as the neck in the original pattern (8″ total — 4″ each side). 

If creating your own pattern from scratch, start with some basic knitting books or design books that show the standard dimensions of various necklines and sleeve applications.  Or use other patterns you have liked as a starting point.  That is what I plan to do for the sleeve cap on this sweater: I have a sleeve cap that fits really well so I am using it as the basis of the sleeve shaping. 

I am sure there are various software packages that do this for you, but I am cheap and have not felt the need to invest in it yet!  The “free” graph paper has served me very well over the years. 

I am working on the sleeve right now and will post a picture when it is done — it looks pretty crazy in its current state!

Older Posts »

Powered by WordPress