
I thought I would share a knitting tip that some of you asked about in reference to the Mitered Cardigan I am currently working on — it is still progressing at a snail’s pace (if a small, slimey, armless snail could knit ;)).
This information can be applied to any knitting project as long as you create graph paper in the appropriate gauge. I use the Actual Size Graph Paper generator. I know there are others but this one is the best one I have found. It will allow you to create graph paper of any ratio.
Basically, you draw out the shape you want on the graph paper and then fudge around with the knit shaping to create it. By “fudging” I mean that the sequencing should make sense to you as a knitter. For instance, instead of “bind off 5 sts, 3 sts, 4 sts” I would make it “bind off 5 sts, 4 sts, 3 sts” to create the shape, even though either might work with your diagram.
The illustration on the left shows the general sketch for the neck and armhole shaping I used for the Mitered Cardigan. The red line shows the shaping I was going for and the blue line shows how to recreate the shaping with knitting. The graph paper shown is not to scale, but gives you the idea.
The picture on the right shows how the final piece matches up with the drawing. When you use this technique, the knitted piece should follow your outline exactly as long as you use the correct gauge on your graph paper. It is really cool!
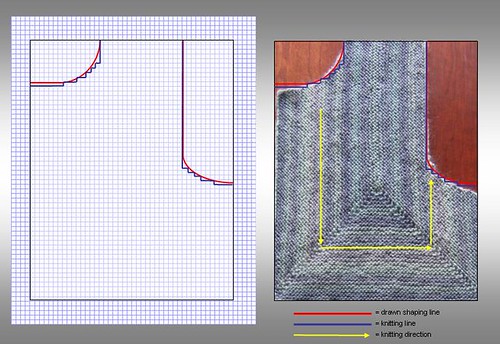
In the case of the Mitered Cardigan, I needed to cast on additional sts to create the shaping, due to the direction of the knitting — shown with yellow arrows. This is not typical. Usually, you will be binding off/decreasing sts to create your shaping — the principle is still the same.
How did I know what the shaping should be in the first place? For the armhole, I knew the overall width of the body and the width I needed at the shoulders. The difference between those two numbers had to go! The neckline is a standard jewel neck: 3-3.5 inches lower than the back. I made it the same width as the neck in the original pattern (8″ total — 4″ each side).
If creating your own pattern from scratch, start with some basic knitting books or design books that show the standard dimensions of various necklines and sleeve applications. Or use other patterns you have liked as a starting point. That is what I plan to do for the sleeve cap on this sweater: I have a sleeve cap that fits really well so I am using it as the basis of the sleeve shaping.
I am sure there are various software packages that do this for you, but I am cheap and have not felt the need to invest in it yet! The “free” graph paper has served me very well over the years.
I am working on the sleeve right now and will post a picture when it is done — it looks pretty crazy in its current state!


Thanks for the information and the link to a great tool!
Comment by twinsetellen — April 20, 2008 @ 9:30 pm
That graph paper is a really valuable tool; I use it all the time.
Comment by surly — April 21, 2008 @ 9:35 am
Susan- You should have a degree in Knitting Engineering.
(slimy armless snails- ew)
Comment by Lorraine — April 21, 2008 @ 11:14 am