theraineysisters knitting and so much more

May 13, 2007

From Susan — Back at 8

Filed under: Back Story,Knitting Tips — lv2knit @ 11:02 am

Back at 8% that is!!  I finally got back to where I was on the Peacock Shawl.  Last night, or should I say this morning, I was at the every end of the row I had been on when I ripped back and found a funny looking stitch.  It was the middle st of the 3 garter sts at the end of the row.  I attempted to fix it, and the whole garter edge started to disembowel for several rows!  Eeeeeeeeeek!  You know how hard it is to fix the end of a row when it has unravelled!  There I am at 1:30 a.m. trying to salvage the shawl so I would not have to rip back — again — to my lifeline!  I managed to do it but I’m kind of afraid to peek at it today ;).

Here’s something interesting.  Have any of you done this before or seen it done?  I think it could be a great idea. 

SpiralBound.jpg

I found it on Nicole’s blog, All Buttoned Up.  It sounds like a number of people have done this with books they really “use,” like Sensational Socks, etc.  I think it has potential.

Happy Mother’s Day to all the Knitting Mothers out there!!

Maybe your kidlets have actually said this!

If Mother Would Only Stop...

May 7, 2007

From Susan — Peacock Soars! Cough Cough

Filed under: Knitting Tips,Peacock Shawl -- Susan's — lv2knit @ 1:03 pm

I have been so busy admiring Surly’s beautiful knitting I have barely had time to do any of my own!  I have a done a little more on the Peacock Shawl:

PeacockYarn004.jpg

This is not the greatest picture but at least you can see the pattern emerging.  Sally assures me that blocking will cure all of its ills. 

Do you ever wonder as you knit a shawl how far along are you?  It is so hard to tell, especially when you have a shawl that starts with rows of 3 sts — to call that a row and count it against the end rows is absurd!  I have put together a tip sheet that shows how to figure out how much knitting you have done, relative to the entire shawl.  It is not heavy math (and I’m sure most of you have or could figure this out if you wanted to), but the tip sheet is included under Susan’s Gallery, nonetheless.  Using my How Much Shawl Have I Knitted So Far tipsheet, I calculated that I have done about 8% of the total shawl.  I don’t know if that is helpful information, or depressing!!

I am also plugging slowly away at my Mitered Tote — no new pics, but here is a picture of the most beautiful thing we have in our yard:

Appletree.jpg

This apple tree is so gorgeous — if it ever goes, we are sunk. 

Take care and enjoy the spring!


May 1, 2007

From Susan — Silk is Finis

Filed under: Back Story,Knitting Tips,Vittadini Nicole 1 in Silk — lv2knit @ 11:32 pm

I really like Japanese short rows!!  Like most knitters, I have never been fond of short rows.  I think they cause a tear in the space-time continuum that I like to think of as my lovely knitted fabric.  However, Japanese short rows do no such thing, when executed correctly.  They create a fabric with short row shaping and minimal short row ick (technical term!). 

SilkTopShortRows.jpg

We have posted this link before but it bears repeating: Nona Knits Japanese Short Rows.  Use it!  Good knitters do not let other good knitters do bad short rows ;).

Anyway, jump ahead a couple of days and the top is finshed:

SilkTop003.jpg

The color in the top picture is much truer — why is it so hard to get good pictures?  Why does it look so BEIGE in these pictures? 

I am not thrilled with the top — it looks like you could buy it in a store for much less money and effort.  No one will think it’s silk, and I think the color should be prettier.  However, I do recommend the pattern if you are looking for a nice summer top.  It calls for 20 sts/4″ gauge which is very common, the pattern can be sized to any figure, and it is easy to do. 

SilkTop004.jpg

SilkTop005.jpg

Those of you who have been paying attention will notice the absence of bobbles (Mary M. will not be surprised!).  Yes, I have an active aversion to bobbles.  I had already decided to forego the bobbles on the back — I thought they would cause bumps that looked like tumors growing on my back in perfect alignment.  I got to the front and actually knitted the bobbles on the first section, but thought they were way too much effort for the result, so I did a bobblectomy.  I substituted some textured knitting instead.  Again, another reason to like this pattern for its adaptability.

The timing of this FO is great because I got an email today stating that my PEACOCK YARN IS IN THE MAIL AND WILL ARRIVE TOMORROW OR THE NEXT DAY.  Do you realize what this means!!??  I am mere hours away from starting the project of my [recent] dreams: many hours of aggravation and love to make a shawl I will never wear.  Heaven.

priest.jpgBless me Father, for…….

Okay, I’m not Catholic, but I have a confession.  I have never knit a lace shawl before — not in laceweight anyway.  The Peacock Feathers Shawl will be my first foray into the mysterious and scary world of actual laceweight lace knitting!  Whew.  I feel better clearing my conscience.  I did not realize it was my first until I started swatching some lace in preparation for the Peacock’s arrival.  It felt unfamiliar.  I racked my brains for a memory of knitting a lace shawl.  Lots of examples in DK+ came to mind, as well as some failed attempts at laceweight.  But no shawl.  Ever. 

So, this should be fun!

I am also slowly knitting along on the Mitered Tote — which is PERFECT mindless take-along knitting.  I will be totally content: work on lace at home and tote on the road.  My world is in order.

April 29, 2007

From Sally — Inside of Widdicombe Fair

Filed under: Knitting Tips,Widdicombe Fair — Sally @ 5:55 pm

I won’t steal Susan’s clever “skirt lifting” title, but Lisa asked me to show the inside of Widdicombe Fair. She was also wondering about some of the floats, which she thought looked as if they could be quite long. As a quick refresher, here is what the blanket looks like. (I’ve now finished the third out of five horse repeats.)

Some of the floats are quite long for fair isle. I think the longest is 17 stitches, but there are numerous others in the 10-13 range. My rule of thumb is to do nothing for any float up to 8 stitches. Eight is my cut off. At that point, I will “catch” the other color at some convenient point. For example, if I have a 9-stitch float, I will:

1. Try to convince myself that I should stretch my 8-stitch rule to include 9. I’m never successful.

2. Knit 4 or 5 stitches, catch the unused color, knit the remaining stitches.

What I try to be careful of is where I catch it. I don’t want to “stack up” those catch points on top of one another. So, if in the row below I also had a long float, I try to make sure I catch the next float one or two stitches apart from the first. I also don’t want that caught color to ever peek through, so I try to not catch it right above a color change. I’m probably thinking too much, but that is my nature.

If I have a really long float — such as the 17-stitch one in this blanket — I’ll catch the unused color twice.

Here is the inside of the blanket:

Someone asked about wedding shawls. I’ve been thinking a lot about that question, but I don’t have a great answer. I think it so depends upon what level of difficulty you would want to tackle and what shape shawl you want. For example, the Forest Path Stole that was published in Interweave Knits would make a beautiful wedding shawl if you wanted a rectangle. Heritage Knitting and Fiddlesticks both have some lovely patterns — but there are so many shawl patterns out there. I’m no expert.

What does everyone else think?

April 24, 2007

From Susan — Pick Up

Filed under: Knitting Tips — lv2knit @ 1:49 am

AuntieAnn asked the following question yesterday:

Picking up stitches seems to me to be one of those under-documented areas of knitting — which leg, or both legs? To twist, or not to twist? I wish I knew a way to pick up stitches where the back side looks as nice as the front. Any tips there, retired finishing pro?

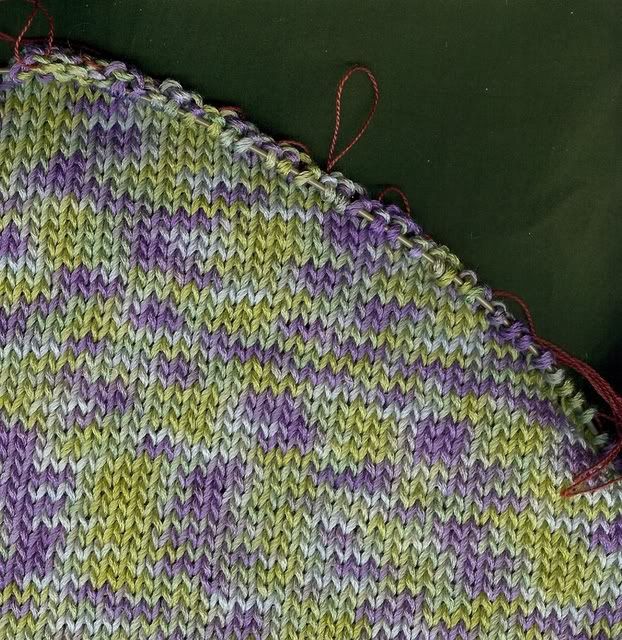
I truly believe that picking up the sts around a neckline or front band can really make or break the appearance of the finished garment.  I am very fussy about the way the picked up edge looks — and I generally don’t give a rat’s patootie how the edge looks on the non-public side.  The exceptions are when the inside of the garment may be viewed by others: like a state fair judges OR, in the case of some collars, if they flip open so the inside is visible. 

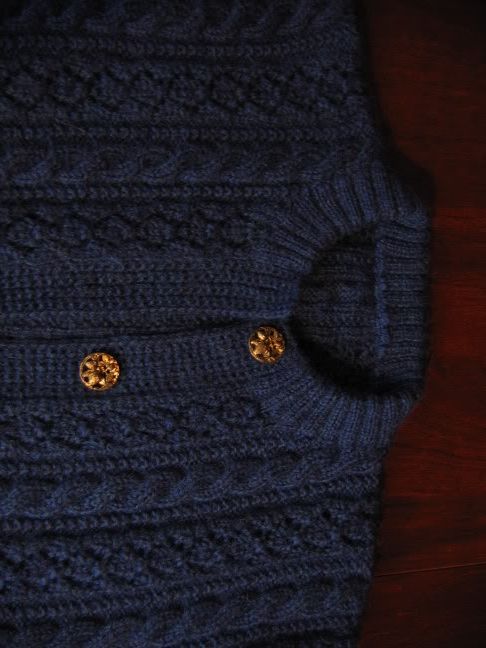
When I pick up a standard neckline, I pick up as deeply into the garment as I need to to get a perfect edge.  I really don’t care if there is bulk that goes to the inside.  What matters to me is how it looks on the public side.  I go through the entire thickness of fabric because this tends to make a tighter and nicer looking edge.  And I never twist (though I might for a sock gusset).

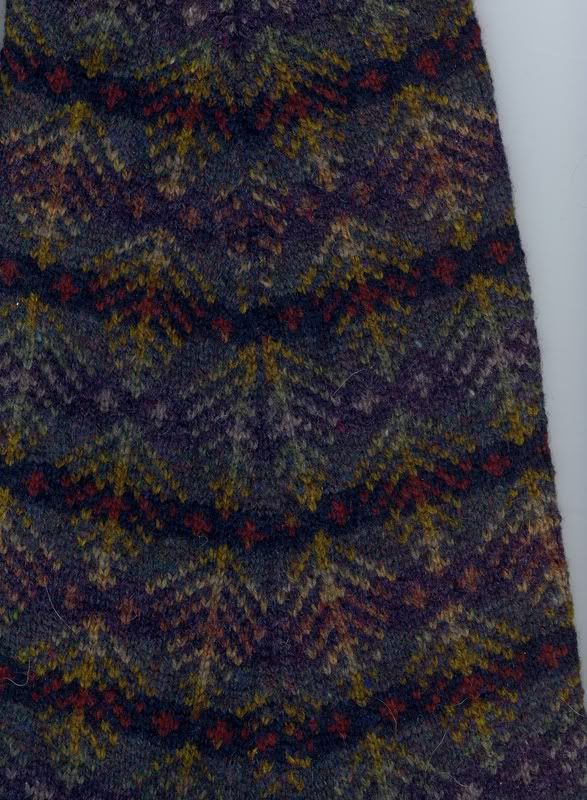
Here’s an example of a very standard neckline, with any bulk being covered by the turned in edge:

pre-StatefairPics002.jpg

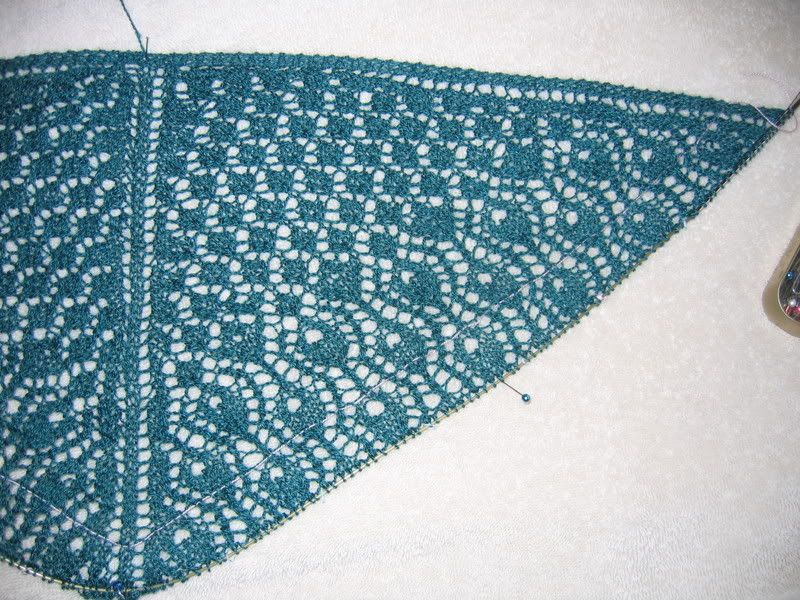
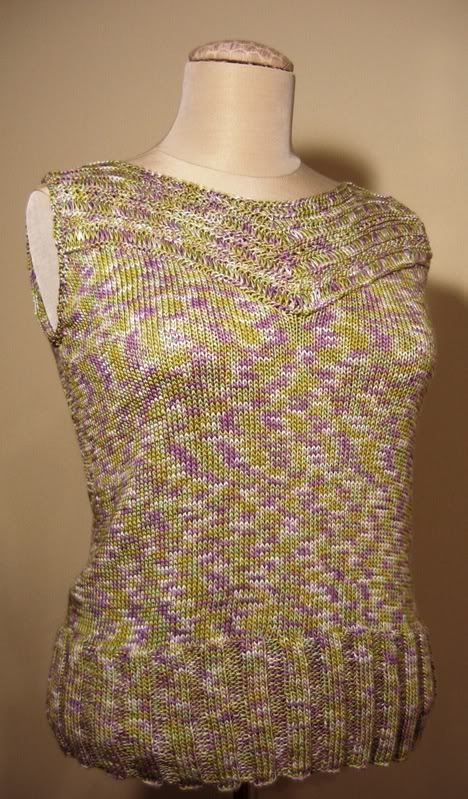
There are occasions with a cardigan when the front could flip open and the inside of the collar might be seen.  Several years ago I knitted the Berry Tree Cardigan (AS, Stillwater) for my daughter. 

Collar002.jpg

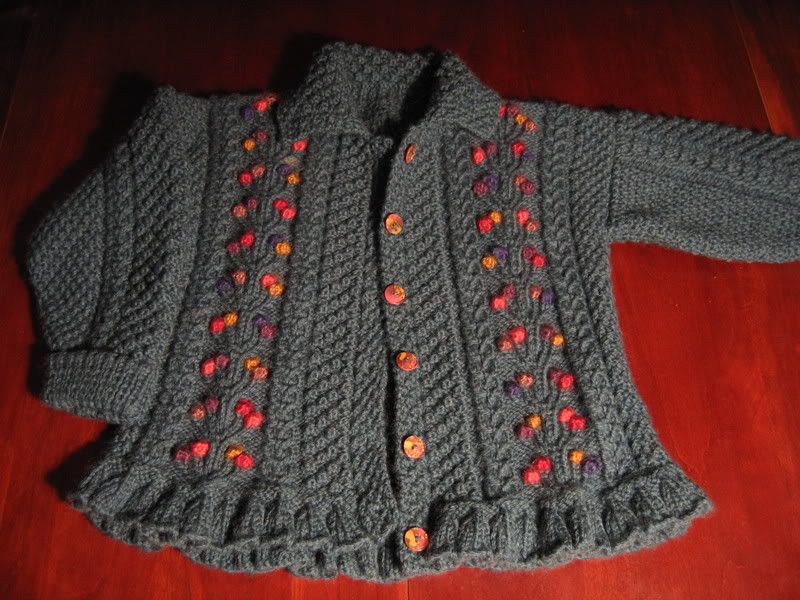
I experimented with a number of pick ups for the collar but there was always a bulky line on the inside, which I was afraid could be seen if the cardigan was unbuttoned. 

I invented (? — at least I’ve never seen it anywhere else) the following technique for this situation.  I’m not saying it’s perfect.  The picked up edge from the public side does not look as nice as a standard pick up, but the non-public side looks better.  It’s a trade off.


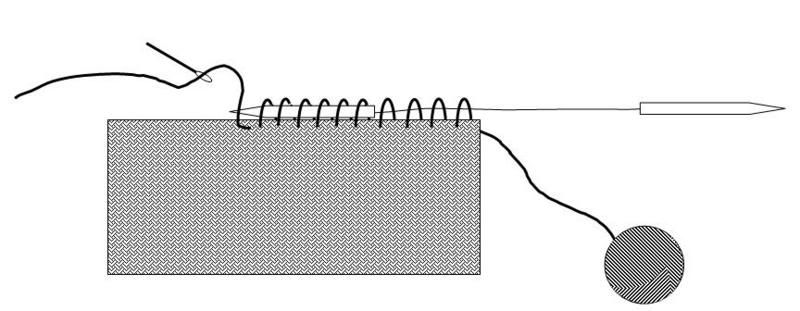
Susan’s Circular Needle Cast On
Use a circular needle the size needed for the collar.  Without cutting it from the ball, pull a length of yarn long enough to make all the sts needed for the pick up row of the collar (approx. 4-5 times the length of the neck opening).  Thread the end through a blunt tapestry needle.  Lay one end of the circular needle along the neck edge and make evenly spaced sts with the tapestry needle.  The sts will not pull out easily as with a regular pick up row.  To undo the sts, you’ll need to pull each out separately.
Use safety pins to mark off sections to help you with spacing.  Once all the sts are on the needle, start knitting from the other end of the needle with the yarn attached to the ball.  This method will not work well with yarn that is extremely nubby or frays easily.

Slide1-9.jpg

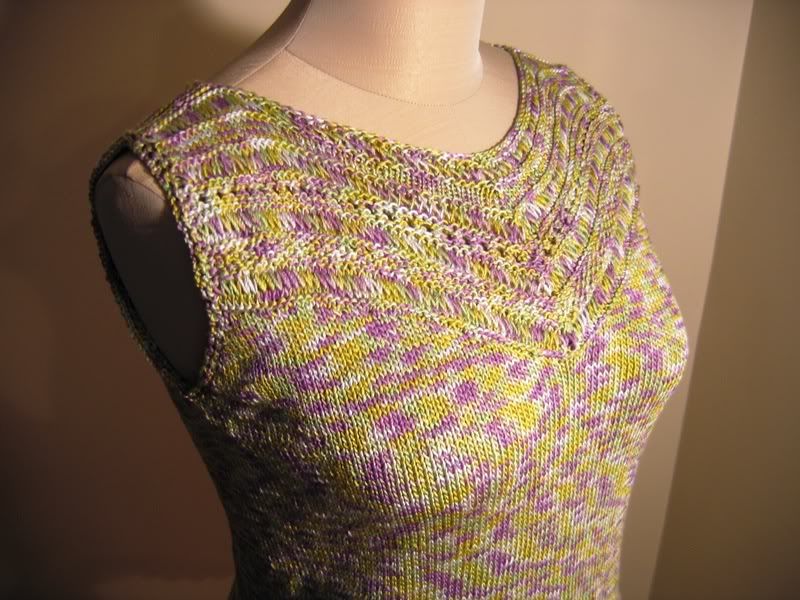
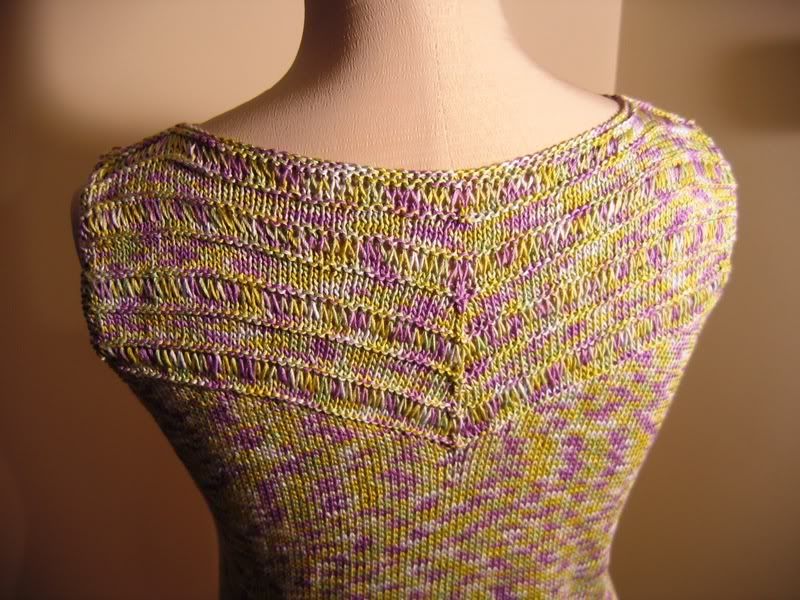
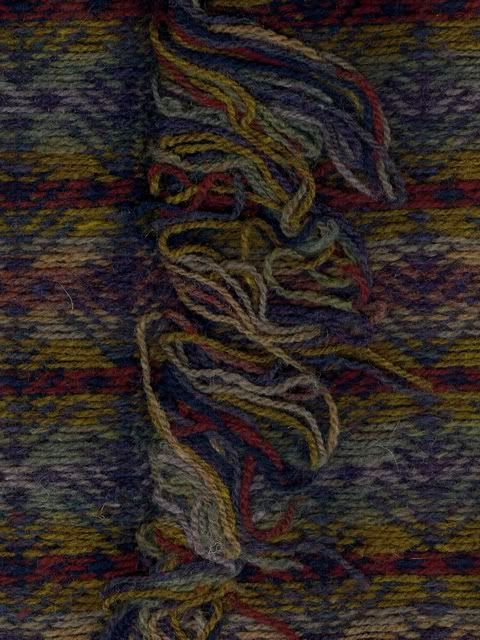
 Here is a picture of the collar:

Collar003.jpg

Here you can see both the right side and the inside edges.  Like I said, not as beautiful as it could be on the outside, but it is totally reversible. 

Collar.jpg

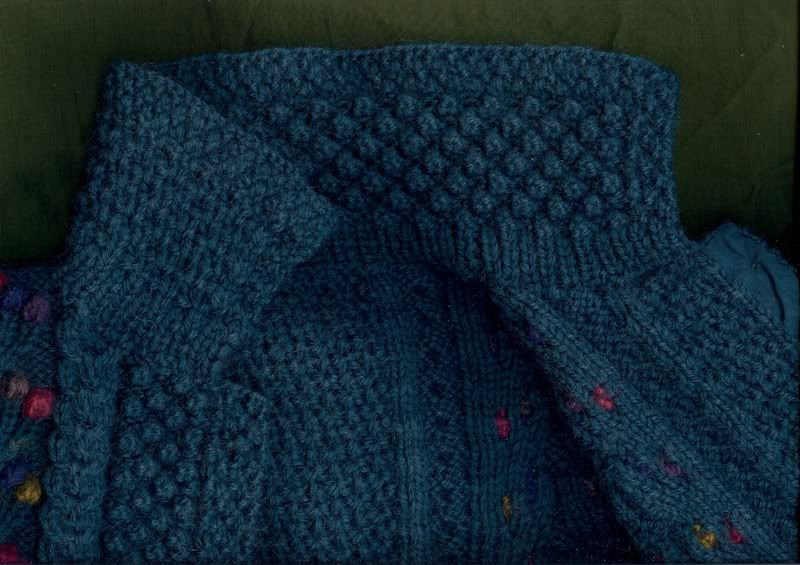
I don’t use this method very often because I prefer the right side to look nicer, but it is an option in certain situations.

As for my knitting tonight, I got very little done.  I worked solely on the lil Lady Bug sweater.  My friend has a deadline so that means I have a deadline ;). 

And where the @@##$%%$#@@!##$%#@@ is my Peacock Yarn?????

Addendum: I have heard of the method that Brigid describes, but I have never used it.  It seems like it would work well.  You pick up normally on the right side and then pick up the same number of sts on the wrong side, through the loop of the picked up st if possible.  You knit in the round until you get past the edge of the garment and then k2tog to join the front edge and the back edge into one.  It essentially covers the edge.  It can be bulky with heavy yarn, but would look very finished.

Michele with 1L asked about how I choose what to enter in the fair.  I knit what I like, but will sometimes time the project so that I have something to enter.  You can only enter one item per category, so if I was trying to choose between knitting a hat or mittens and I already made mittens that I was going to enter, I might make the hat instead.  I also hold items that I finish one year until the next if I already have something for that category.  That means I have to wear it carefully for the whole year so it doesn’t look trashed and worn out.  But I do focus on projects I will enjoy knitting and/or wearing above all, and the fair is just a side benefit that’s fun to do.

And do I know what the judges are looking for?  I wish!!  The years I think I’ll walk away with everything, I usually get skunked and then they’ll surprise me another year!


April 18, 2007

From Sally — Quick Answers to Some Questions

Filed under: Knitting Tips,Widdicombe Fair — surly @ 1:37 pm

Toby asked a few questions in the comments to my last post, and I thought I would answer them here to make sure she saw the answers.

1. I have never knit Fair Isle, but given your comments I think that I might try one of these one day. Would you recommend a class or is it possible to learn Fair Isle from a book?

That’s a hard one. If you want to try to learn how to knit fair isle two-handed (holding one color in one hand and the other color in your other hand), then you might want a class. True confession time: that’s not how I knit fair isle. I never got comfortable doing it that way and didn’t feel like taking the time to practice. (Thank goodness there are no knitting police.) When I did try it, I found that my gauge wasn’t as consistent as I’d like. I know that practice would greatly improve that, but — well — then I’d have to be practicing instead of knitting. So I drop one color and pick up the next; I’ve gotten very fast at doing that. I keep the dark color always hanging to my right and the lighter color to my left. It’s just how I do it.

Anyway, back to your question. The only tricky parts are cutting and finishing the steek. You might be able to find someone to give you a private lesson on that if you can’t find a class.

2. Do you order the kit from Virtual Yarns or purchse the yarn from your LYS?
Is the yarn in the kit a wool that is soft enough for a baby? Is the pattern available separately from the kit?

You can’t purchase these blanket patterns separately; they are only available as a kit from Virtual Yarns. Although it’s not the softest yarn in the world, it is much softer than other fair isle yarns in my opinion, especially after having been washed (by hand of course). Moreover, if you used a different yarn, you’d probably have to do some sewing in order to keep the yarn from unraveling after you cut the steek.

3. One thing I wasn’t clear on is where there would be steeks in a straight piece of knitting. I’ve read about them. I thought steeks were normally inserted in a sweater where the piece was knit in the round. Is the blanket knit in the round and then cut?

Yes. The blanket is knit in the round and then cut. It fits nicely on a 24″ circular needle. As I said in my first post, I started with a provisional cast on. When I finish all of the repeats, I’ll leave the live stitches on the needle. Then I’ll cut the steek, pick up stitches along one side, pick up the stitches from the provisional cast on, and then pick up the stitches from the remaining side. The border is then knit in the round as well. There will have be a LOT of stitches on the needle, at that point but I’ve done this before and the border is slow but not difficult.

April 11, 2007

From Sally — Rose Colored Glasses

Filed under: Cap Shawl,Knitting Tips — Sally @ 1:41 pm

I have shawl fever. I can’t stop myself. After finishing the Peacock Shawl, I needed to knit yet another one. The yarn I’ve wanted to knit with for a long time was even in my stash: Rowan Kidsilk Haze in Blush (Shade 583). I bought a fair number of skeins of this yarn a long time ago, but had never decided on the perfect project for it. Now I have: the Cap Shawl in the Victorian Lace book. If you have the book, the pattern is on page 28. If not, here is a thumbnail photo I was able to find.

The Cap Shawl is a circular shawl approximately 74 inches in diameter, and it may very well be one of the easiest patterns in the book. Even so, it is gorgeous and dramatic. It would be a great shawl for a beginner, except for the start. (I think that the start of a circular or square shawl can be a bit tricky for beginners, but maybe I’m wrong.)

Here is mine the day I started it (two days ago).

I was going back and forth about which size needle to use. The pattern, which uses Kidsilk Haze, called for a U.S. 7 (4.5 mm), but I thought that would be too loose. I started it on a 6 (4.0 mm), and that looked a bit loose as well. I jumped all the way down to a 4 (3.5 mm). I did that because I knit my Icarus Shawl out of Kidsilk Haze on a U.S. 3 (3.25) and it turned out well.

I finally liked how the center looked on the smaller needle, but I was a bit concerned that the shawl might not stretch enough when blocked and end up being too small. So, after about fifteen rows, I switched to a U.S. 5 (3.75 mm). Now, I might have stayed with a 5 except for one problem: I wanted to knit it on Addi Lace Turbos and the only ones I could find in a hurry (I’m a bit on the impatient side) were size 6.

What to do? What to do?

I decided to put in a lifeline, try the 6, and then rip back to the lifeline if I thought the knitting looked too loose. If you are unfamiliar with the term lifeline, it’s a way of saving your sanity in lace knitting. When you are at a point where you know your patterning is correct, you thread smooth yarn through your live stitches and leave them there. Later, when — I mean if — you make a mistake, you have a safe place to rip back to. (It can be very tricky to rip back down safely to the right row when you have all the decreases and yarnovers involved in lace knitting.) The idea is to do periodic lifelines — every ten or 20 rows — so you are only “risking” a certain number of rows of your knitting.

Well, this is not the kind of pattern I would normally take the time to use a lifeline with, but I went ahead. I was on my Knitpick interchangeable needles, so I just threaded some spare yarn from my Peacock shawl through the little hole you use to tighten the needle tip on to the cord. That way, I could just knit a row and automatically pull that yarn through for the lifeline.

NOTE: If you do this — or even if you are threading your lifeline through your live stitches with a tapestry needle, DON’T PUT YOUR LIFELINE THROUGH YOUR STITCH MARKERS!! If you do, they won’t move with you on the next row. Yeah. It would be a problem. Here is a (slightly out of focus) photograph of the lifeline right after I put it in. Note how the lifeline jogs around the stitch marker.

I have not had much time to knit this week, but the first half of this shawl is so easy (I don’t need to even glance at a pattern or chart) I’ve made some progress anyway.

Here is a photograph I took today as I went from a 24″ circular needle to a 32″:

Finally, here’s another photograph. I’m including this one because you can more clearly see the lifeline I put in two days ago. I’m staying with the size 6 needle, but I haven’t bothered to pull that lifeline out. I could (should?) put in another one, although I don’t think I need one. (Saying that out loud probably dooms me to some horrible mistake.)

March 13, 2007

From Sally — Lace Needles

Filed under: Knitting Tips,Three-Cornered Shawl — surly @ 3:36 pm

Gale asked: “Are you finding laceweight silk difficult to knit with? I am wondering about how it behaves on needles.” Funny you should ask — I was planning to write about the needles I was using but I wasn’t ready to because I was waiting to try a new pair. They came in the mail and I’ve been playing with them a little bit this afternoon.

As I mentioned in my earlier post this morning (please scroll down and read it too if you haven’t already), I worked myself into a mini-frenzy about which size needle to use with my very fine lace weight pure silk. I originally decided to use a U.S. 4 (3.5 mm), and that is what I used when I cast on the first time. I’m glad that I was forced to start over because the second time I went down a needle size, which was the right thing to do. (I’m now using a U.S. 3, which is a 3.25 mm.) In fact, I keep wondering whether I should have gone all the way down to a U.S. 2 (3.0 mm), but I think I’ll be okay.

Anyway, the needles you can see in this morning’s photographs are not Addi Turbos (my usual needle of choice). They are the Knit Picks needles. Now, I know that my first pair fell apart BUT those were some of the interchangeable needles. In sizes smaller than a U.S. 4, Knit Picks only makes non-interchangeable needles. In other words, they are constructed like a “normal” circular needle, all in one piece, and are fairly similar to an Addi Turbo. There are differences: the Knit Picks circular needle has a pointier tip than the Addi and the cord seems lighter and more flexible. Perhaps even more important, I noticed that something about the surface of the Knit Picks needle gave it more “drag.” It didn’t feel as slippery as the Addi Turbos and so the silk seemed to cling to it a little better. (As an aside — I would have used Addi Natura bamboo needles with the silk, but since I rarely knit with bamboo needles, I didn’t have any in the right size. I ordered some but, alas, I did that when I was still planning to use a size 4 needle. So I have some beautiful virgin Addi Naturas waiting for a project, but this one ain’t it.)

However, as many of you may know, Addi has just started making a circular needle specifically designed for lace knitting. So I ordered some of those, too. (What can I say? Knitting is about collecting and possessing, at least for me.) They came in the mail today. At first glance (and by first glance I mean at first ripping the package open as fast as I could), I thought they looked bigger and fatter than the Knit Picks needle. It’s an illusion caused by the color (they are gold); the tips fit through my needle sizer in exactly the same way. So, I knit a row, transferring the shawl to the Addi Lace needle to compare the two. That was a purl row, with no patterning, so I figured it wouldn’t tell me much and it didn’t. Here is a photo in mid-transfer, with a photograph of what I am making as a backdrop.

I’ve now knit part of a pattern row with the Addi Lace needles. Like the Knit Picks needles, the tip is relatively pointy (but it doesn’t jab me in the finger). The cord is very light and flexible — these would be good needles for the Magic Loop method of knitting. These needles are hollow, coated brass whereas regular Addis are nickel-plated. They have as much drag as the Knit Picks needle — maybe even a slight bit more. So, in most respects I would say that the Knit Picks and the Addi Lace needles are both great for silk and almost interchangeable. Almost. I give a slight edge to the Addi Lace needles because, based on these two pairs, the join on the Addis is noticeably smoother. It is, therefore, much easier to push the stitches up to the tip of the left needle when necessary.

Some photographs of the two different needles with no knitting on them. (The Addis are a 24-inch; the Knit Picks are a 32-inch. My Addi 32-inch Lace needles are in use on the shawl.)

Finally, to finish answering Gale’s question: the lace weight silk is interesting to knit with. It’s very slippery, and yet at the same time it has a kind of dryness that makes it sticky. What I mean by that is the yarnovers I make will often stick to the knit stitch that is next to it, so that I have to separate them on the following row. It’s not a big deal, but something to be aware of. It looks as if that is happening a bit less with the Addis, but I haven’t knit enough to know that for sure.

Now aren’t you sorry you asked?

February 15, 2007

From Sally — A Stitch in Time Saves Eight (Not Nine)

Filed under: Feather and Fan Shawl,Knitting Tips — Sally @ 4:27 pm

First, I’d like to say thank you for the birthday wishes and for all of the advice and encouragement on the Pearl Crisis. I went ahead with the large pearls I have. Having no invisible thread, which was a good suggestion, I chose not to care. I’ll post some pictures of the finished product eventually.

Today, however, I’ll tell you a story about the hazards of not paying attention. No, it’s not the starting-my-hair-on-fire story – it’s something far more horrible: making a really big mistake in your lace knitting a number of rows back when you have 1300+ stitches per row. Yeah. That.

There I was, knitting happily along on my Feather and Fan shawl. I was doing the pattern row, where you place yarnovers and decreases to get the feather and fan shaping. I did a series of 8 k2togs, and then I was supposed to do 8 yarnovers separated from each other by a single knit stitch. There was a problem, though: I didn’t have 8 stitches left in my pattern repeat. I only had three or four. Looking at my knitting I realized that four rows earlier — the last time I was supposed to do a pattern row — I had forgotten to do the yarnovers on one half of this particular repeat. I’m not sure how I did something so stunningly careless, but I did.

Now, if I had forgotten or dropped one yarnover, it would be no big deal. I would simply use a crochet hook to create a yarnover between the appropriate two stitches by stretching the running thread between them and then “laddering” my way up to the current row using the running thread on the intervening rows. That after-the-fact yarnover would be a bit smaller than the rest of them because it would be created using less yarn than truly necessary. Moreover, the stitches on either side might get pulled a bit tight. It’s not a perfect solution but after blocking, it would be pretty imperceptible. That solution would certainly be far preferable to ripping back.

That trick wasn’t going to work to replace 8 missing yarnovers. There simply would not be enough yarn to do it in such a concentrated place. Let me just remind you that I have 1300+ stitches per row right now; it takes me almost an hour to knit one row. So ripping back was not an option, either.

So here’s what I did. I undid the k2togs that overlapped where my yarnovers were supposed to have been. Then I ripped back the 8 stitches that were supposed to have yarnovers in between them. (Four rows total.) That left me with four long strands of yarn. I broke each of them in half. For each row, I wrapped new yarn around my needle 8 times to roughly calculate how much yarn I needed for each new stitch I was going to create and then added a bit extra. I then felt spliced that new length of yarn into the middle of what was already there. (Is this making sense?) I then had enough yarn to add in the yarnovers on the first row and then ladder up the stitches created by them on the subsequent rows.

It was a pain in my birthday ass, but a lot easier and faster than reknitting four rows.

February 11, 2007

From Susan — Can you stand another…

Filed under: Knitting Tips,Oregon Cardigan — lv2knit @ 11:02 am

…post about my &^%$##%&*&%$ Oregon sleeve?  Oh, good!

Which would you rather deal with (in terms of weaving in ends), this:

Bodyinside.jpg

or this?

Sleeveseamlineinside.jpg

My thoughts exactly!  When you knit a fair isle cardigan, you join new colors at the center front.  The ends get cut off in the “cutting the steek” phase, so you don’t need to worry about them.  However, for pullovers and sleeves, there is no cutting so there is no trimming so the ends need to be dealt with somehow.  Some people simply tie the ends together and trim them short.  Others weave them in.  I WAS a weaver, until my last fair isle when I became a partial splicer.

With Rona I spliced the colors that had gradual changes — you can see from the picture that some changed like water colors and other color changes were very abrupt.  For abrupt changes, you can do a Russian Join, but that can be very time consuming.  I wish I had taken the time!  When I turned my sleeve inside out, it looked like the picture above — LOTS of ends!!

This time I am splicing every color change, even if it is somewhat abrupt.  I don’t care if the splices look like a candy cane!  I made a very conscious decision to not give a rip.  Here is what the under sleeve looks like:

Sleeveseamline001.jpg

I don’t think you can tell that the colors are spliced.  So, I am very happy now and will be REALLY happy when this puppy gets done, if that ever happens ;).  The dog hair that shows up in every picture comes free of charge.

« Newer PostsOlder Posts »

Powered by WordPress