Wow — Sally’s new Japanese sweater is a tough act to follow, so I won’t even try. Her sweater is absolutely stunning, and I can’t wait to see it in person. I will be doing that soon, as I head east for another foray into the exciting world of the Maryland Sheep and Wool Festival — first weekend in May!!
So, what have I been up to? I have been working on Sleeve #1 of my Ode to Joy and also doing the prep work for the upcoming knitters guild program. The sleeve seems particularly slow, even for a sleeve. Could it be because I need to add 60 rows to obtain the length I need? Hmmm, maybe.
Since my knitting life is far more boring than Surly’s, I thought I would share a couple of tricks I have gleaned over the years.
Counting 1-2-3
Many steps in the knitting process require counting: counting rows between cable crossings, increases, decreases, etc. This requires keeping track of said counting. Row counters that have to be turned, hash marks that have to be written down, will all fail you because they rely on you remembering to do something. Each and every time. No forgetting. Ever. And I have found that I am not reliable! So I have learned to let my knitting to do the counting for me.
Your knitting will never lie to you.
Counting Rows with Waste Yarn
My favorite method for counting rows has been mentioned many times on our blog. It is one of the best tips of the trade I have ever found (Sally likes it, too).
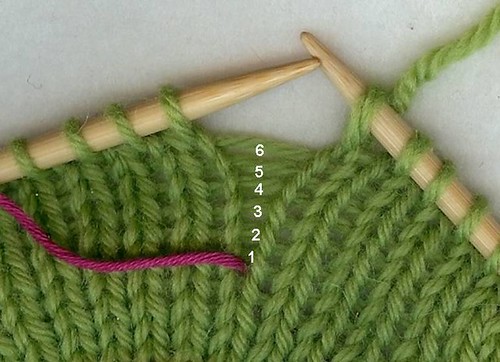
Let’s use the example of sleeve increases. They are done every “x” number of rows. In our example, let’s say the increases are to be done every 6 rows.
On the row that you do the first increase, you ** work the increase and knit a few sts. Place the waste yarn between the stitch you just worked (the last st on the RH needle) and the next one to be worked (1st stitch on the LH needle). Yep. it just lays there between the two sts. Now knit the row normally, working the second increase at the end of the row.
The running thread of the row you just worked will hold the waste yarn in place and counts as one row. Work 5 more rows. Now there are 6 rows above the point where the waste yarn was placed. Since we are doing our increases every 6 rows, it is time to do another increase. Repeat from **, weaving the waste yarn from front to back, or back to front (this step alternates), on each row that an increase is made. If I forget to weave the waste yarn — I just pull it through under the running thread on the next row.
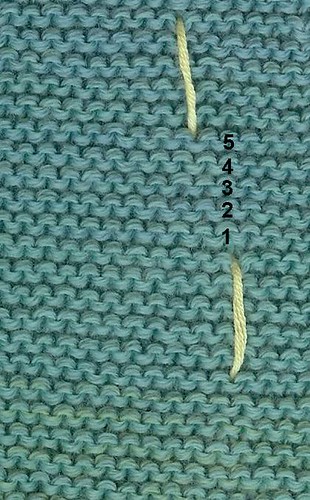
Your knitting will look like the sleeve shown here:

Each “slash” represents 2 decreases — here you see 6 decs every 4 ridges and 7 every 5 ridges
I am doing decreases because this is a top down sleeve, but the principle is the same.
I changed the color of my waste yarn to show where I changed from every 4th to every 5th ridge decs, though this is not really necessary. I do not remove the waste yarn when I’m done with the first sleeve — it tells the sleeve’s story. What happens if I get side tracked on a project? Can’t find my notes? Put the project away for months (years??!!) and now I want to start the second sleeve? My waste yarn tells the story.
Counting Increases with Markers
The other thing I do is something I started out of necessity: I really must get distracted easily — like, before I get to the end of the row!  Have you ever forgotten to do the second increase (decrease) on a sleeve? You eventually count your sts and find out the count is off.
Where is the missing stitch? You look carefully along each edge and BINGO. There it is (or should I say isn’t). Back about 5 inches on the left hand side of the sleeve! You have two choices: rip back (ugh) or fudge and add the stitch. The fudged sleeve will end up a bit funky, and you’ll always know the mistake is there (ugh).
To avoid this, I use stitch markers to show how many increases (or decreases) I actually did vs how many I was supposed to do. For a bottom-up sleeve, after a few rows and increases, I place markers to mark off my original sts. The increases will be on either side of the markers.
The number of sts on each side of the markers must always be equal and always equal to the number of increases indicated by my waste yarn (3-3-3, 10-10-10…always equal). I count these sts every so often — if the numbers don’t match, I catch it early and don’t have much ripping to do.
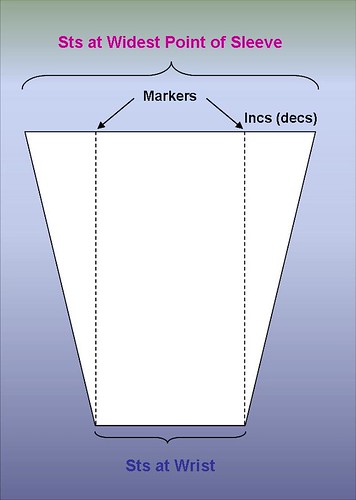
With top down sleeves, you start at the widest point in the sleeve. The markers show where you will end up and the total number of decreases will be on either side of the markers. As you work the sleeve decreases, the number of completed decreases (indicated by your waste yarn) plus the remaining sts on each side of the markers, need to equal the total number of decs.
Whew! This is a lot of writing for a very easy concept. I hope you find it useful. I know it has saved me a lot of time, stress, and concentration.
I can count without counting!  Now you know exactly how lazy I am!!


