I’m glad so many of you liked the square neck on my Kauni. I meant to include this link in my post yesterday. It describes the whole square neck process with my Kauni. I did not want to go on and on in a regular post, but figured that those who are interested could click. It is also located as a link in “Susan’s Gallery” for future reference.
December 17, 2007
From Susan — Kauni Part Deux
Thanks for all of your fabulous comments about the Kauni. It did dry, and I did finish the inside edges. I tried it on and the neck isn’t as tight as it was before blocking, so it will be fine. It will be a wearable sweater with jeans and turtleneck (gee, that’s a new look for me!).
Here is Lettie doing the modelling. I know, I know — maybe I’ll add a picture of me in it later with buttons ;).

And the back:

Marina asked me about why I grafted the sleeves and how — here is the response I sent her:
Warning: Esoteric knitting blather ahead
The mattress stitch I tried using to sew the sleeves in just did not look right. So I decided to try grafting the sleeves in instead.
Looking at the right sleeve as the example, I ripped back to one row after the red squares (a yellow row). I picked up around the sleeve opening with red, and then used yellow for my grafting yarn. This created the second row of yellow after the red squares. When I picked up around the armhole, I used a size 5 needle instead of the 4’s I would have used for the straight knitting portion (I switched between 2 needle sizes throughout my Kauni: 4’s for the single color rounds and 5’s for the stranded rounds). I did this because the stitch was going through the fabric and I wanted the red line to be visible.
The button quest will now begin…dum de dum dum DUM!!
December 16, 2007
From Susan — Free at Last, or “It’s Good Enough for Me”
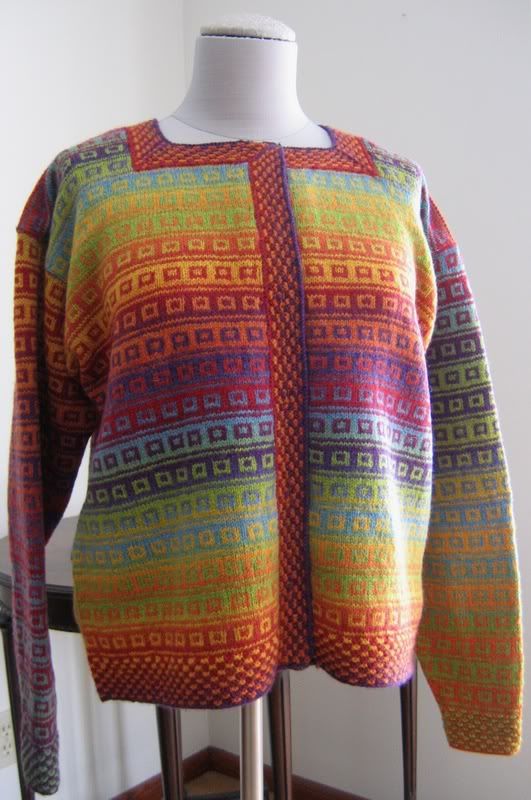
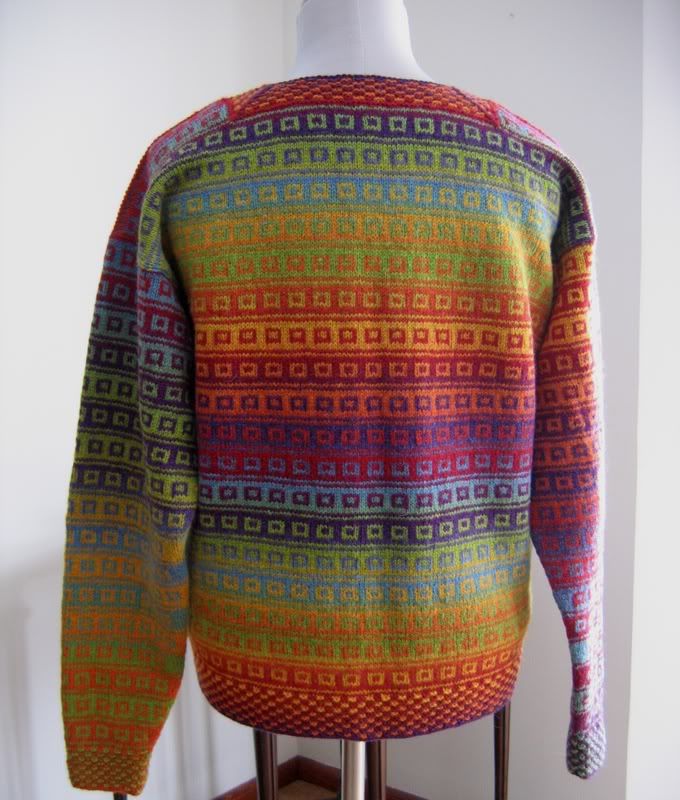
I am so amazed: I finished my Kauni Cardigan. I’m not amazed by the finished Kauni — what amazed me was that I allowed myself to BE FINISHED with it!
As I described to my knitting peeps on Thursday evening (at a wonderful Christmas soiree hosted by Mary!!), I had major Kauni concerns:
1) The sleeves were not going in as planned. The seaming looked like crapola. So I decided to pick up around the armholes and graft in the sleeves. This step was completed this morning. They did turn out looking better than the seams did. I should have picked up and knitted down after all :(.
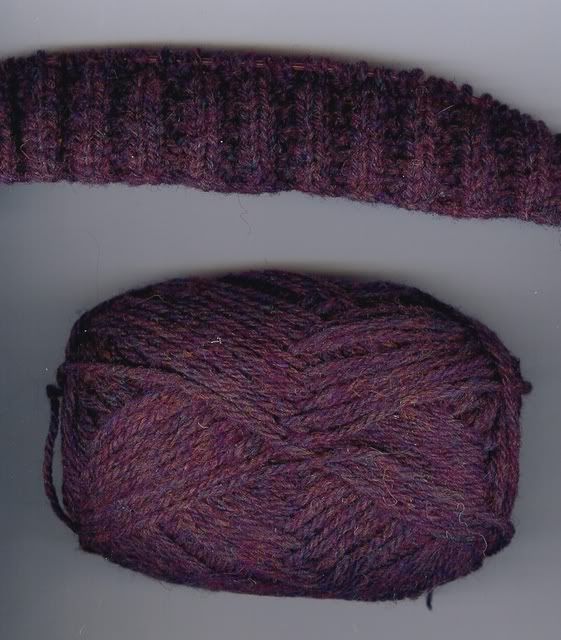
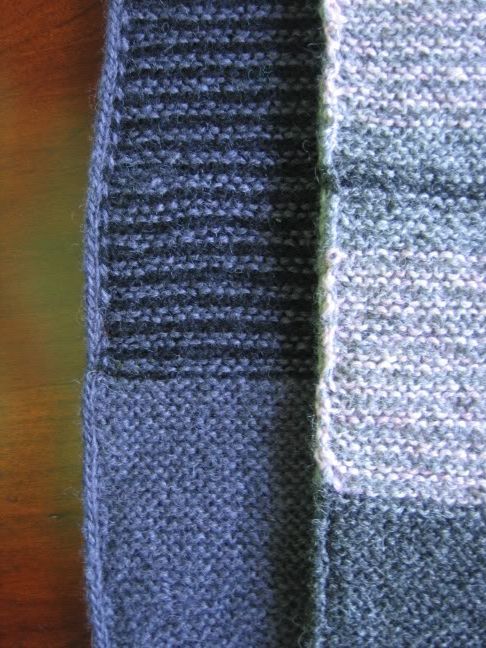
Note: I chose to knit the sleeves from the cuff up so I could control the color of the cuffs. It didn’t even work out that way! I ended up with strange-colored cuffs anyway! Here’s a pic to prove it:

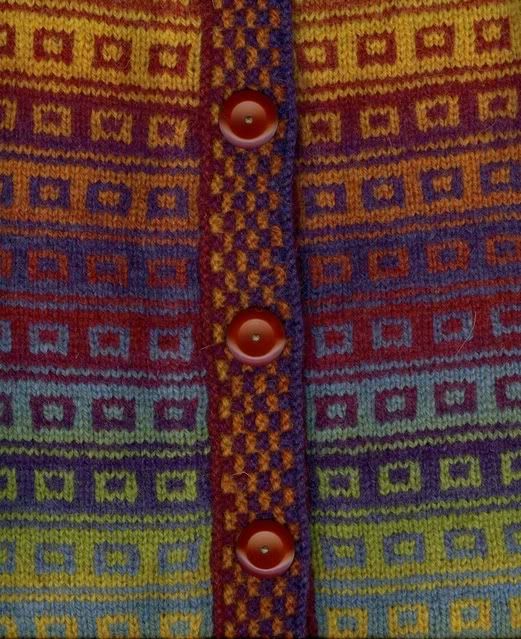
2) I did not like the front bands AT ALL!! I had spent 12-15 hours knitting the front and neck bands in one piece on 60″ needles (seriously!). I did not like the band for several reasons: band too wide, neck opening too small, top buttonhole not centered, blah, blah, blah; yada, yada, yada. My plan was to redo the band completely, even though many, many hours of knitting would be involved. I wanted the sweater to turn out, of course. I spent most of Saturday evening pouring over my new, improved approach to the band to “fix” all the stuff I did not like about it, but could not come up with a plan.
Drum roll, please. I decided to do nothing. I bound it off and it is blocking at this moment. I tossed in the towel. I gave up. I caved. I decided that enough was enough. AND IT FEELS FANTASTIC!!!! I did not want to spend umpteen hours re-knitting the bands when I wasn’t even sure they would look better. I decided that it was GOOD ENOUGH! I did not strive for perfection or to be the best that I could be — I didn’t care!! Woo Hoo! Susan made a breakthrough :). And, don’t get me wrong, I don’t mean that I ever get to perfection, but at least I do try to do my best — except for today!! [Susan is now doing her ‘happy dance’ around the room]
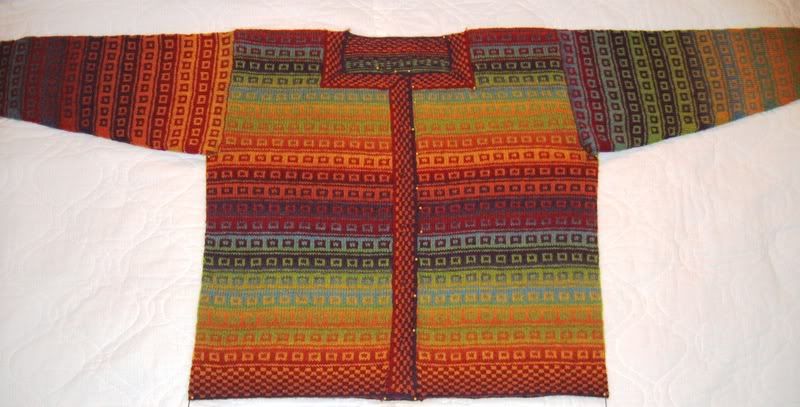
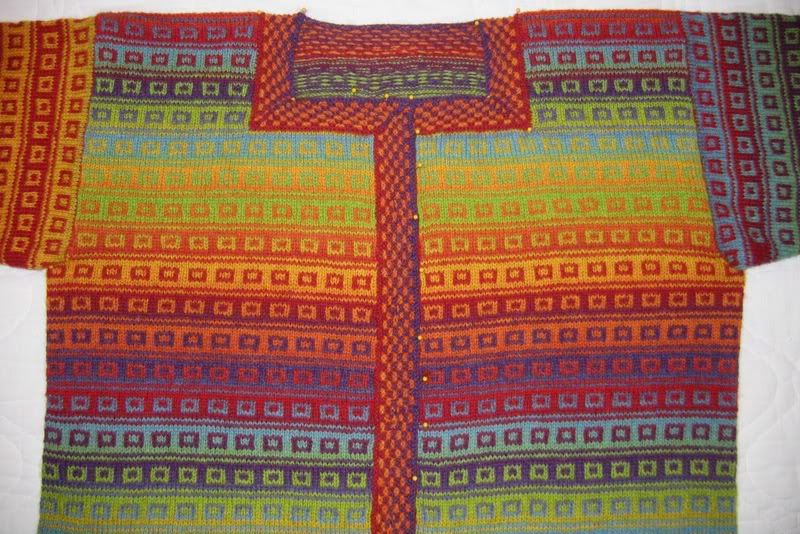
Here is the Good-Enough Kauni:


So I am 95% done with this bad boy! I need to do some inside finishing and find buttons (always a Ruh Roh! ;)), BUT the main part of the Kauni is behind me. I’ll post more pictures when it is off the ground!
It feels so good to be bad! 😉
December 15, 2007
From Susan — While Waiting for My Next FO
Please enjoy this festive vision courtesy of my knitting peep, Cathy — an enabler of my love of all things sock monkey:
Snow Monkey Angels

From Susan to Marina: this is a Christmas card that I scanned in — she did not set up this craziness!!
December 12, 2007
From Sally — Betsy Is Born. Just Barely.
Finishing Ballerina was supposed to mean I could knit what I wanted, but that’s not entirely true. I’m very behind on my stealth Christmas knitting, which I can’t blog about until after the holiday. Real freedom won’t come for two more weeks.
Even so, I did manage to start Betsy. As a reminder, here is the pattern I’m talking about:

I’m knitting mine out of Simply Shetland’s Lambswool Cashmere in Red Hot (shade 1294). It’s very cloudy today and I can’t seem to quite capture the color but this is fairly close. I haven’t knitted much, but in an unusual moment of farsightedness, I knit my gauge swatch the exact size of one of the pocket linings. I was so proud of myself. So I have two pocket linings and nothing else. I’m not sure I’ll use those buttons with Betsy, but the colors look great together. I really like working with this yarn so far.

The lower front and back are all in seed stitch; I am going to do the body in one piece because I don’t like how seed stitch looks when it is seamed.
December 9, 2007
From Susan and Sally — Why Add I-Cord to Ballerina??
Laura wondered about the i-cord on Ballerina, “I am not clear on why you added the i-cord to the bottom edge since there is already a knitted-in i-cord finish to it.”
Susan answered this question in an old post here. Basically, it is because the built in i-cord is not very attractive from the inside*. With a swing coat, like Ballerina, it is possible that the hem will show because the back is longer than the front. Doing applied i-cord afterward makes for a better looking finish:

Susan’s Mermaid at top of photo, Ballerina at the bottom.
*PS from Susan: I should clarify: Hanne’s built-in i-cord is not very attractive from the inside — she does it this particular way in order to have single color i-cord at the hemline even though you are knitting 2-color stripes as shown in Mermaid above.
In general, it is absolutely easy to have built in i-cord on either edge of a garter stitch strip of any width:
For a 3-stitch i-cord edge on ONE side of garter stitch:
Row 1: knit to last 3 sts, bring yarn forward, slip last 3 sts to right hand needle one by one as to purl; turn
Row 2: knit
For 3-stitch i-cord edge on BOTH sides of garter stitch:
All Rows: knit to last 3 sts, bring yarn forward, slip last 3 sts to right hand needle one by one as to purl; turn
December 8, 2007
From Sally — At Long Last!
 Ballerina is finished. It’s a good thing, too — I really wanted and needed it to be off the needles and in the finished pile. I’m not sure why knitting this drove me crazy or why it took so long. I knit the first half in a very short time period, but the second half just dragged like a bad movie. Oh, well.
I made a few minor changes in the pattern. Like Susan, I did an applied iCord at the bottom and along the neck band because I think it gives it a more finished look. It’s a lot of iCord by the time you go all the way around.

Now, when I finished all of the knitting I tried it on. I was, to say the least, underwhelmed. It was SO boxy that I felt like I was wearing a cardboard box. Cutting armholes in a cardboard box would have taken me a lot less time than I had spent on my poor Ballerina. But I knew from making Mermaid that the yarn would soften and the sweater would have more drape once it was drowned soaked and blocked. It worked. Yay! Here are the obligatory photos of Lucy wearing it. (I’m not sure I’m crazy about how the stripes look wider at the shoulder, but I don’t think there’s much I can do about it.)


I do like how it fits; it looks better on because of the way it moves. Therefore, I am actually — gasp — going to post a couple of photographs in which I’m modeling it. Warning: These are not great pictures. There’s a reason I take most of the photographs in the family although it was sweet of my husband to try. I did some serious cropping as well. Part of the problem was that the angle of the pictures made me look even shorter and stubbier than I am. I mean, I know I’m not the tallest Rainey Sister on the blog, but still. Okay. Takes deep breath. Here you go:


Edited to add: I always get nervous about yarn quantities when I work with kits. For those of you contemplating Ballerina, I did have plenty of yarn. I chose to make the S/M. I lengthened the sleeves by an inch or so and then also did the iCord, which uses a lot of yarn that would not have been accounted for by the designer. I have a full ball and a half of each color left over. (Falkenberg gives you enough yarn for the largest size.)
In other news, Astrid finished her beautiful Roslin and kindly let us show it to you — what a fantastic job! She used Jamieson Spindrift & DK in Peacock (Color 258) as her main color and most of the same colors for the fair isle inset. To accommodate gauge, she knitted the size small to achieve a finished size medium.Â


Astrid, we are so proud of your Peacock Roslin! Thanks for sharing!
Â
December 6, 2007
From Susan and Sally — Roslin is Complete
This is a momentous occasion for us! Michaela finished her Roslin Fair Isle Hoodie! It is a fantastic feeling to see that someone actually used our pattern — wow!
Here are some pictures from Michaela’s blog:


Beautiful! It certainly doesn’t hurt that Michaela is a superb knitter. She used Rowan Yorkshire Tweed 4 Ply — colors 277, 271, 283, 269, 267, 270.  We’re not sure what she did to adapt the fair isle band to accommodate the different yarn.Â
Here is a message Susan received from Michaela on Ravelry:
Hi, Susan and Sally! I finished my Roslin Hoodie last week and I really do LOVE it! It was so much fun to knit with this easy to follow pattern, the yarn I used is wonderful and it fits perfectly. I wear it and wear it — it’s my favorite sweater at the moment! Thanks again for sharing this wonderful pattern! I hope you’ll like my version of your design!
With kind regards from Germany — Michaela
We love it, Michaela, and thank you so much for the wonderful testimonial. It makes it all worth while.
From Susan:
This reminds me of an incident years ago at Stitches (when it was here in the Twin Cities). I was wearing a sweater I had made from a pattern in Knitters. It wasn’t my favorite sweater, but one of my only summer sweaters. The designer was at Stitches and practically tackled me as I walked through the Market. “OMG, you made my sweater!!” She would not let me leave — she kind of stalked me! Now I know how exactly how she felt!!
Real, live joke of the day:
My youngest daughter got her spacers put in for braces yesterday, so of course her teeth are killing her. She got up this morning and said her teeth hurt so much during the night that they woke her up. My husband said, “I know what time you woke up.” She asked, “What time?”Â
“Tooth hurty!”
December 5, 2007
From Susan and Sally — Our Boo Boo of the Month
Astrid, our unofficial Roslin guinea pig ;), found another small error in the Roslin Hoodie pattern. On page 6, Row 26 of the hood shaping instructs you to knit to the end of the row, but at that point you will be purling — it should read “purl to end of row.”  The pattern link and the errata page have been updated.
This means that Astrid is almost done with her hoodie — woo hoo!!!
December 4, 2007
From Susan — Sleeveless in Seattle
Has THAT blog title gotten mileage? I bet it’s been used often! We all love knitting sleeves so much, don’t we?
I finally got back to Kauni, finishing Sleeve #1 and starting Sleeve #2:

You can see that my sleeves are totally fraternal in their twin-ocity. I “planned” it that way 😉 – at least that’s my story. I’ll tell people that the randomness of the colors is part of the Kauni charm and mystique (and hope they buy it!).
Anyway, I have set a deadline of January 1, 2008 to be wearing my Kauni Cardigan — not too tough a deadline to meet if I stay focused…but, we know that it is easy to get tempted! And, it is a very busy time of year.
Especially today: I spent 7 hours in my car. SEVEN HOURS. I did not drive to Chicago either.  I drove to and from work (1.5 hours EACH WAY) and then drove my darling daughter to the dentist: 2 hours EACH WAY (usually a 30-40 minute drive). SEVEN HOURS!!!! People wonder why I hate cars. The reason it took so long is that it snowed today. I love snow but this is just plain torture. 🙁
And to prove I’m not a total Grinch, here is the best part of the trip –Â I love it when someone has the lights on when I get home.

PS — I enjoyed reading all of your comments and stories re: knitting at social gatherings. Natalie made me do a spit take when she compared the hobby of knitting to scrapbooking, whittling and collecting dryer lint in public — picturing people dragging these hobbies along made my day. Thanks, all!


