theraineysisters knitting and so much more

September 3, 2007

From Susan — 1, 2, 3…….

Filed under: Knitting Tips — lv2knit @ 6:14 pm

As I have been working on Hemlock Number Deux, I was thinking about counting rows and what a pain it is for many knitters.  There are all sorts of devices for counting rows — from simple hash marks, to elaborate markers, clickers, etc.  Everyone seems to be searching for the perfect counter.  The problem with all the counters is that they rely on you, the knitter, to remember to mark, click, slide, remove, slip, etc. after every row.  Did I mark that already?  Did I slip it?  I can never remember if I marked the row or not.  So, what I rely on is the knitting to tell me where I am. 

I know many experienced knitters out there know this so please forgive me if this sounds like I’m singing to the choir ;).

It is not easy to read your knitting all the time (I do make notes for some things), but it is very helpful.  Sally and I have already described our “counting with waste yarn” method.  But I am not using that for the Hemlock.  Here is how I am counting the four plain knitting rounds on the Hemlock. 

CountRows.jpg picture by lv2knit

On the left hand side of the picture, you can see the k2tog and ssk.  There are four clear sts right above the decs.  When that number gets to four, the next round is a pattern round.  You do not count the stitch on the needle.  However, when you are counting from a yarnover, you DO count the stitch on the needle, as shown on the right side.  That’s it.  No hash marks, and my knitting tells me if I’ve done the number of rounds I need.  Cuz I am unreliable if I have to do the counting myself!!

August 26, 2007

From Sally — Lucy Models Silver Belle

Filed under: Knitting Tips,Silver Belle — surly @ 6:34 pm

I finished the right sleeve and yoke of my Silver Belle. I was very concerned that it would be wa-a-a-a-a-a-y too large, so I crudely basted it together and tried it on.

It fit! The sleeve was even the correct length. I still have a few concerns.

1. It’s a very heavy sweater because the yarn itself is so heavy, especially with all of the cabling. There’s no shoulder seam to give additional support, so I am hoping that when I pick up and knit the collar it will feel as if it has more shape and structure.

2. Am I just way too old to wear this?

3. Will it be flattering? The neck will end up being fairly low.

4. Am I just way too old to wear this?

5. Is there a reason there are no photographs of the back of this sweater in the magazine or the download?

6. Are there no photographs of the back because I’m too old to wear this?

Wear what you are asking. Here are the photos. This one shows the front (and a lot of Lucy, that little trollop).

Here is the back. The middle two 4-stitch cross cables are on holders; they will go up the back with the two yoke halves being seamed there.

Looking at this, you may be wondering why I was so concerned about the size. Well, in this photograph I’ve unpinned the left half of the peplum. Look how far it goes around Lucy without being stretched in any way. Imagine how big it was when both halves were able to do that.

Sewing the peplum draws it in magically without looking puckered or gathered. This means one could play around a lot with the sizing. The Medium, which I am making, is supposed to be 36″ buttoned. It would be easy to adapt the Medium peplum to a size in between the Medium and the Large by adding a little length to the yoke between the sleeve and the neck shaping and then sewing it to fit. For example, if you wanted to make it 38″ around, you would add 1/2 an inch to the yoke before beginning the neck shaping. (It’s only 1/2 an inch because if you do that on the right and left, you add an inch to the fronts and an inch to the backs, giving a total of 2 extra inches.)

For something completely different, look at the luscious Zephyr Wool-Silk lace weight that arrived in the mail yesterday. (Who could have done this to me? I have no enemies.) It’s Cinnabar. I’m debating between two shawls for this yarn.

From Susan:

Many of you are rightly interested in the new design from Ruth Sorensen (to find the pattern, click on ‘Strikning’, ‘Patterns for Sale’, and then on the British flag):

LeafCardigan.jpg picture by lv2knit

Michelle has started a knitalong for this beautiful cardigan and I told her I would help advertise.  Here is the link.  I would join up in a minute, but I can’t take on any more projects right now.  I’m ::blub::blub:: drowning!

August 22, 2007

From Sally — No Longer Just a Sleeve and That’s No Yoke

Filed under: Knitting Tips,Silver Belle — surly @ 1:26 pm

Does the fact that I am now shunning myself help? I thought not.

I finished the sleeve on my Silver Belle and have just started the yoke. The pattern tells you to cast on stitches for the front at the beginning of one row, work across, and then cast on the stitches for the back of the yoke at the beginning of the next row. Instead, I did a provisional cast on of the front stitches, worked across the sleeve, and then did a provisional cast on for the back at the end of the same row. (I also made sure that I started the yoke in sync with the cables on the sleeve; I wanted to make sure I was crossing all of the four-stitch cables on the same row.)

I did that because I wanted both the front and the back yoke to start on the same row. I also wanted to be able to do a three-needle bind off for the side seam there (using the live stitches after getting rid of the provisional cast on once I’m all finished with the knitting). It makes a cleaner, less bulky seam which I thought would be useful because this is relatively heavy yarn. (I’m using, in answer to some questions asked earlier, Debbie Bliss’s Cashmerino Aran to knit this. It was the yarn called for by the pattern and I even had it in my stash.)

I use a crocheted provisional cast on in which you crochet the stitches directly onto your needle with waste yarn. Here’s a poor photograph — it’s hard to take a picture with one hand while doing something.

Eunny Jang has some good directions for how to do it here; she even has photographs that are in focus. Imagine that! Scroll down to Invisible Crochet Cast On I. When using this technique for a provisional cast on, you use a nice smooth waste yarn and then start knitting with the project yarn.

Here is the sleeve with the crocheted provisional cast on stitches waiting to be knit. (In order to use the provisional cast on here, I have to break the yarn and start with new yarn at the beginning of the yoke.)

Here is the sleeve with the beginning of the yoke. Not much to see yet.

Finally, a close up of the front stitches and the provisional cast on.

August 10, 2007

From Susan — The Sun[rise Circle] Also Rises

Filed under: Knitting Tips,Sunrise Circle Jacket — lv2knit @ 12:03 pm

This has been a crazy week with a little bit of knitting, but a lot more “non-knitting.”  I really enjoyed seeing the progress that Sally has made on her Silver Belle.  It is absolutely gorgeous. 

I’d like to answer a question from a reader/commenter:

Nancy asked a question about The Sunrise Circle Jacket which she plans to start soon:

I have re-read your blogs about the Sunrise Circle Jacket since I am contemplating starting it in the next weeks. I am hesitant about making it since the facing on the front flaps is so obvious, at least in the pattern. Neither of your sweaters have this obvious line of facing. Is this because you used a dark color of yarn?

Actually, the color of the sweaters is not the determining factor in how visible the facing is from the right side.  It is all about the way the facing is attached to the wrong side of the sweater.  Here is a picture of my Sunrise Circle to illustrate not what you can see but ::hopefully:: what you cannot see:

SunriseCircle2.jpg picture by lv2knit
Lettie likes the Sunrise Circle!!

I make sure that the facing is sewn in such a way that I don’t pull up on the sweater fabric as I attach the facing.  I let the facing float on the WS and use thread to tack down the underside of the facing to the WS of the sweater.  The stitching is invisible from both the RS and the WS of the sweater. 

The following diagram will help explain it — we all know that words get confusing.

Facing-1.jpg picture by lv2knit

I think the most visible method is the “knit the two edges together” method which is often used on hems.  It is easy and requires no additional finishing BUT it creates a very visible join line — ridge — whatever you want to call it.  This method has its place and I have used it, but do not use it if you are concerned about the visible ridge that will occur as a result.  Just my opinion!! 🙂


July 30, 2007

From Sally — Finishing Steeks

Filed under: Knitting Tips,Widdicombe Fair — surly @ 3:31 pm

My baby blanket, Widdicombe Fair, is finished. Baby X has not yet made his way into the world and so I can now tell my husband “I told you so.” (He was a bit nervous about my finishing this in time.) I have a few in-progress photos to show you before I get briefly into steek finishing. There is no video, alas, because my videographer was on her way to Colorado before I got to that point. (More on that later.)

Here is the blanket as I finished the last row before binding off. I’m including this just to show how it makes a nice little corner even on the needles.

Instead of a regular bind off, I did a two-stitch I-cord bind off. It gives a little more firmness to the edge and makes a nice miniature welt that matches the garter stitch in my opinion. While working on it, I had a bit of help from my assistant. If you look carefully, you can see his favorite toy — a chewed up rattan coaster — tucked up into the knitting in the upper left-hand corner.

Here is a close up of the border with the I-cord bind off.

I know you all want to see how I finished the steek, which is kind of embarrassing actually. I’m not the expert finisher that my sister is. Moreover, I had a lot of trouble taking photographs of what I was doing with one hand while still trying to do something with the other. So please take a moment to lower your expectations and then we may proceed.

First of all, steeks are wonderful things. They do add a tiny bit of bulk or thickness; that’s usually not a problem but just something to keep in mind. I think the yarn from Virtual Yarns is a bit heavier than other fair isle weight yarns, and so there is a bit more thickness to my blanket steeks than there are with some of the fair isle garments I’ve knitted. I try to keep that in mind when I figure out what I’m going to do with the finished product.

There are a lot of different ways to finish steeks. Truth be told, if they are not going to show you probably don’t have to finish them at all. (This only applies, of course, to items knitted out of Shetland wool which sticks to itself.) For example, I never bothered to finish off the armhole steeks to a child’s sweater I knitted at least ten years ago. My son wore it and then my niece. The steeks are still fine. They haven’t unraveled. Nothing was done to these steeks — no hand or machine knitting of any kind.

The traditional way I learned to finish steeks is the cross-stitch method. After you cut the steek, you trim it down to two stitches or so and then trap the raw steek edges with Xs of yarn. I did that when I first started out with fair isle. Here is what it looks like. *Covers eyes in embarrassment.*

Maybe it’s just my crappy technique, but I’ve never thought this method looks all that great. Its advantage is that it is really simple and requires absolutely no machine sewing.

I’ve now switched to doing a crocheted edge along the steek because it makes it flatter (thus reducing that little bit of bulk) and I think it looks more finished.

I know of two ways to do a crocheted edge to finish a steek. One way is to crochet on either side of the center stitch of the steek before you cut it. To be able to do that, the center of the steek has to be stable enough to “hold” the crocheting and therefore it’s recommended that you spit splice your color changes instead of just adding in new yarn. (I think you could do a variation on this in which you do the crocheting close to the edge stitch on each side and then cut but I’ve been afraid to try it.) To me, doing all that spit splicing at the center of your steek sort of ruins the benefit of the steek. As a result, I’ve never tried this method. I suppose it would always work at the armhole steeks of a cardigan because you don’t use those steeks to change color. It would also work if you were only using two colors. (Examples: Jade Starmore’s Persian Tiles or the Kauni Cardigan.) If you are interested in a better explanation of this method, it’s described in great details with lots of photographs on Eunny Jang’s blog here.

The method I use requires a sewing machine. You don’t need to machine stitch the steek to keep it from unraveling — the reason you do it is to stabilize the edge so that you can crochet along it. Here is where the bad photographs start. I don’t do anything to the cut edges of the steek until I have finished the border. As that child’s cardigan demonstrates, those steek stitches are perfectly happy to just sit there. Once the border is finished, I sew a line of stitches between the edge stitch and the cut edge. I use the edge stitch, which has folded in nicely, as a guide for stitching. I try to stitch through the middle of the third stitch from the edge stitch. You could do it closer to the edge, especially if you are a better seamstress than I am. You want to make sure you don’t sew through anything but the steek. Susan could probably give some great tips here; I just muddle through.

Once I stitched the steek, I trimmed it close to the stitch line.

Then I began to crochet along the edge, inserting the crochet hook into the middle of the second stitch from the edge stitch. (That is, I did that except in those places where my sewing line wasn’t as straight as I would have liked.)

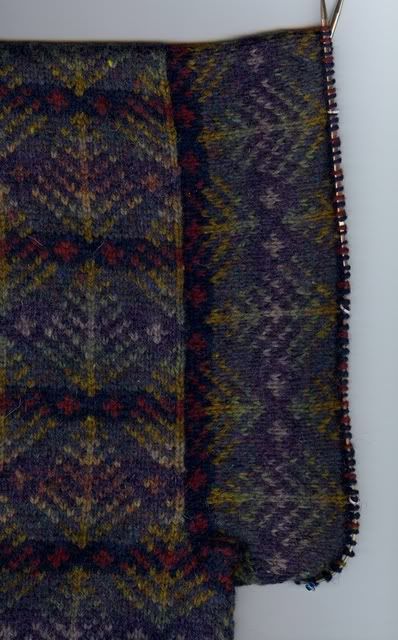
A close up of the crocheted edge:

Close up of the crocheted edge of one my sweaters:

For a blanket, it would probably also look nice to knit a facing to cover the steek (although you would have more bulk) or cover the steek with a matching gros grain ribbon. I didn’t do that because I’m lazy. Here is the baby blanket blocking.

For those persistent few still reading, here it is off the blocking wires:

Sadly, my little assistant who so loved this blanket, is gone. He and my daughter left yesterday for Colorado. I cried like a baby when they left.

She’s happy; that’s what counts. (She may not be as happy when she sees I posted her picture.)

July 24, 2007

From Sally — Cutting a Steek: the Sequel

Filed under: Knitting Tips,Widdicombe Fair — surly @ 9:41 am

Thanks for all of the comments on my amateur film. I wasn’t sure whether I should leave it on the cutting room floor (I know. Bad pun.) Several of you asked how I pick up the stitches and finish off the steek. Fortunately, I only need to pick up stitches along each of the blanket sides (where the edge stitches for the steek are) because I have live stitches on the bottom (where the provisional cast on was) and the top (where the stitches were left live). Because row and stitch gauge are different, you can’t pick up as many stitches along the edge as you have rows. This is a Jade Starmore pattern and she tells you how many stitches you need to pick up and when you should “skip” a row as you do. If you are working a pattern that isn’t as explicit, you need to work out the ratio for yourself.

Here is another amateur video showing how I pick up the stitches.

Ooh. That was painful. I hate hearing my own voice. Anyway, you might have noticed I was slipping my needle under both “legs” of the edge stitches as I picked up the new stitch. As a reminder, I was doing this:

That’s my personal preference. You don’t have to slip it under both legs. It’s actually a bit faster to slip it under just the first leg (like this):

The reason I do it under both legs is that I think the new stitches lay closer and more tightly against the fabric. I prefer how it looks when all is said and done. It’s just a matter of personal preference.

PainterWoman asked why I knit this in the round. This kind of color knitting — fair isle — is done in the round because it is faster. You never have to twist the yarns to prevent a hole (as you would with intarsia). You always have the right side facing so that you can see the pattern as you work, which makes it much easier to spot a mistake (and therefore prevent it).

July 22, 2007

From Sally — Cutting a Steek

Filed under: Knitting Tips,Widdicombe Fair — surly @ 12:45 pm

My eyes are still glazed over from reading the 700+ pages of the last Harry Potter book. Even so, I’m going to attempt to return to the real world and to my knitting.

I finished knitting the body of my carousel baby blanket, aka Widdicombe Fair. I may finish the entire thing before the baby is born, which would be nice. Here is a photograph of it mere moments after it was finished.

Here is a bit of a close up of the top. It is still “on the needles.” As is typical with fair isle knitting, you bind off the steek stitches as you knit the last row. Although the steek stitches have been bound off, I have live stitches at the top and I will have live stitches at the bottom when I undo the provisional cast on.

The fun part, though, which I always look forward to, is cutting the steek. The first time you try it, you might want to make sure you’re relaxed — or at least make sure you won’t care if you make some horrible, irrevocable mistake.

Alrighty then. There’s really nothing to it so I decided to enlist my personal videographer and let you see the cutting of the steek. Please don’t laugh. I know I have a weird farmer’s tan (it’s because I bicycle a lot and I wear bicycling gloves; I just hadn’t realized how white my hands look in comparison with my arms until I watched this in horror). The cutting also seems to go on forever because this is such a long steek — the blanket is almost three feet long. Finally, the video is a little blurry because I had to compress it in order to upload it.

Now I’m off to undo the provisional cast on and pick up all the stitches for the border: 900 and then some.

July 8, 2007

From Susan to Dorothea — Guten Tag

Filed under: Back Story,Knitting Tips — lv2knit @ 11:11 am

Guten tag, Dorothea!!  Thanks for reading!  Dorothea commented on my last post and had several questions.  Here are my responses:

1) Where can you find the Market Squares Bag pattern? 
This great pattern was originally featured in issue #63 of Knitters Magazine and was later put into a book containing 13 bag patterns that had all been in the magazine.  There are many outlets for the book, called Bags: A Knitter’s Dozen.  I’m sure you will be able to find it easily.  My Market Squares Bag was knit in 5 colors of Cascade Pastaza, and then embroidered with leftover fair isle jumperweight wool:

MarketSquares.jpg

2) Where can you find the felted clogs pattern?
The felted clogs are from Fiber Trends Pattern #AC-33 and should also be easy to find. 

FeltedClogsfelted011.jpg


3) Do I knit the sleeves on a fair isle sweater from the armhole opening to the wrist or from the wrist up and sew them in?
 
The only fair isle sweaters I have made are designed by A. St*rmore, and I follow her instructions.  She has you join the shoulders by grafting, cut the armhole steeks, pick up the sleeve sts around the armhole opening and work the sleeves from the top down:

StartofSleeve-1.jpg

This is a picture of Oregon in progress, showing the sleeve right after I started it.  As you can see, when you knit the sleeves this way, the pattern sometimes needs to be turned upside down to be knit correctly, as I did here so the trees are going in the right direction.

I think I covered all your questions, Dorothea.  Thank you for reading and commenting.  Glück!!  Good luck finding the patterns. 🙂


July 7, 2007

From Susan — Throw Me a Line, Please

Filed under: Back Story,Knitting Tips — lv2knit @ 3:13 pm

Michelle commented — yes, the same bountiful Michelle as recently described — about using a lifeline for the Mystery Shawl.  [Aside] — I do believe that Sally and I are the only two knit-bloggers in the universe not making the Mystery Shawl [end aside].  She made a mistake and had to rip back to her lifeline. 

While I was knitting the Peacock Shawl, I got teased about using a lifeline in knitting — like it was the same thing as training wheels on a bike — for knitting nerds 😉 !  But I like to think of a lifeline the same way I think of using stitch markers, or any other knitting aid: as something that eliminates extra and unnecessary effort.  Could you do a lace pattern without stitch markers?  Sure, but why go through the mental exercise?  I rarely needed my lifeline, but it was nice to know it was there, and the effort (less than 5″) seemed well worth it.  I’m glad it was helpful to Michelle.

June 27, 2007

From Sally — Mermaid

Filed under: Knitting Tips,Sally's Mermaid — surly @ 5:42 pm

As promised (threatened?), here are a few progress shots of my Hanne Falkenberg Mermaid. I’m finished with the body and I’ll start the sleeves as soon as I have a chance. (That might not be until I finish the Widdicombe Fair baby blanket; that baby’s arrival is getting closer and closer.)

I’m not sure what I think of this project yet, although it looks better in person than it does in my crappy photographs. It started to rain just after I got Lucy nice and comfortable on the bench so I had to flee to the indoors before I could get some better shots.

Here’s the front (I would have positioned the lapel better if I had had the time):

Here’s a shot of the back:

The garment feels a bit “stiff,” and it doesn’t have a nice drape to it. I’m hoping that wet blocking will soften the yarn and let it relax. We’ll see.

Like Susan, I made a couple of changes to this pattern. You are supposed to knit the i-cord edge for the left side, then pick up stitches into the i-cord and start knitting. Instead, I did a provisional cast on so that I could knit the right and left lapel/collar in one piece and not have any seam up the middle of the back neck. In other words, I had live stitches on both the right and left side and worked the i-cord on those. That turned out nicely. The one issue is that when knitting an applied i-cord in a contrast color, the original color (white in this case) sometimes pops through. To avoid that, the easiest solution is to knit one row in the contrast color before binding off in the i-cord. I couldn’t do that here, though, because the entire jacket is knit in garter stitch AND the collar/lapel folds back on itself. If I had knit a row in blue, there would be obvious “bumps” of blue and white at the edge of the i-cord when the collar was folded back. It would look like the color transitions on the inside of the jacket:

Wrong side:

Susan reminded me of a technique we learned at Meg Swansen’s knitting camp. It was invented by Joyce Williams and can be found on page 18 of Sweaters from Camp. Let’s assume you are doing a three-stitch i-cord bind off. Normally, you would have your live stitches on the left needle and then cast on three stitches. Then you would knit 2 and then SSK (slip two stitches one at a time as if to knit — the second stitch being slipped would be one of the live stitches from the garment — then knit the two slipped stitches together through the back loops). When faced with wanting to make sure that the color of the live garment stitches doesn’t show through, you do this variation: Knit 2, slip one, yarn over, knit one (this is a stitch from the garment, in my case white), then pass the slipped stitch and the stitch produced by the yarn over over the knit stitch. It’s a bit futsy (the yarn over can be tricky to get your needle under), but it definitely helps hide the color.

Here is a close up of the i-cord bind off.

The jury is out on how Mermaid will turn out. I’m still undecided.

« Newer PostsOlder Posts »

Powered by WordPress