I am so glad I decided to re-embark on this project. I really am enjoying it, though each stitch makes me feel a tad guilty about Eala Bhan 
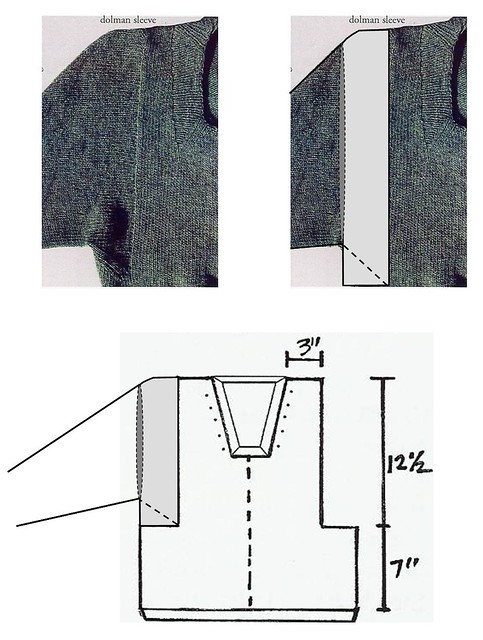
The sleeves are the coolest feature of this sweater. They are described as “dolmans.” In my earlier post about this sweater, I said the following,
“The sleeves are described as dolmans, but I think a more accurate description is a modified drop shoulder with an underarm gusset. The appearance is that of a dolman, but it really isn’t. EZ was brilliant. As you knit the sweater, you “cut out” a huge chunk at the armholes, but then add it back in (gray section in illustration below):

This is interesting. There are many projects now listed on Ravelry and many of them have the appearance of a true dolman. I tried on my sleeve and it fit perfectly — like a normal (non-dolman) sleeve, just as I predicted in my earlier description above. I do not know why, but I do like it!!
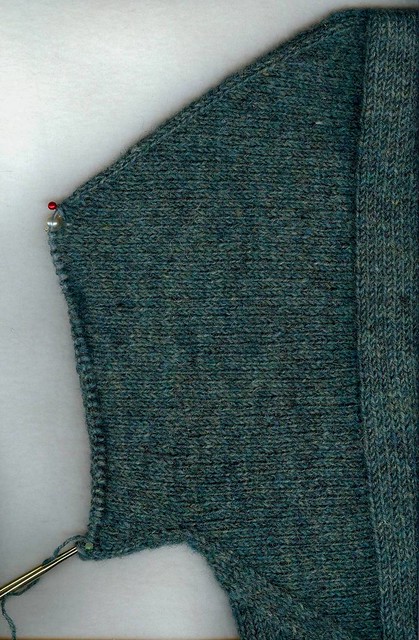
My sleeve so far:

I could not get a good picture to save my life, so this is scanned…thus I could not get the whole sweater
It looks just like the original and fits beautifully. I am happy so far. I also am not shaping the sleeve as dramatically as was done in the original — it gets too skinny too fast for most people. I followed the pattern’s shaping until all of the gusset sts were decreased away and then I started doing “regular” sleeve shaping. That is why on my sleeve the bottom edge of my sleeve slants down — it would be straight across and be getting skinnier without the added sts.
“Regular” they are not. Normally on a top down sleeve, you would decrease 2 sts every “x” rounds/rows to get the stitch count desired. Because you decrease 2 sts at the top of the sleeve every other round, you must INCREASE along the [what would usually be] the underarm seam line in order NOT to decrease the stitch count. So, for every 6 rounds, I increase every other row twice, and then do not increase on one of the rounds, thus resulting in 2 sts decreased every 6 rounds. It’s all very backward and confusing! My brain hurts. After ten sets of these I will switch to every 8 row decreases (or “un-increases” as the case may be!). At least that is the plan, though it could change if the numbers indicate.
PS from Susan: I tried this on again before I went to bed last night. I thought, “What if I’m wrong? What if it fits wonky and I am delusional?” It fits. Looks good! I probably could have started my sleeves with the every 8 round decreases though. EZ was decreasing 2 sts every other round, so I thought I was safe with every 6. The sleeve fits and is about 3/4 of the way to my elbow. I may keep going and possibly rip back a bit if it gets too small too soon.


It looks great! I might even get tempted.
Comment by Surly — October 26, 2010 @ 10:42 pm
That is making sense. But boy o boy am I glad you are generous enough to share the process. The sweater is beautiful. I need to stick with the Christmas knitting plan before I free the Green Sweater from limbo.
Comment by Kim — October 26, 2010 @ 10:56 pm
Wow! This is an extremely helpful post. After reading your earlier dismay with the Green Sweater, I thought “well, hmm…, the experts here don’t really find this project to be as wonderful as hyped up to be. Maybe I won’t do it after all..” And now, to see renewed excitement and wonderfully detailed instructions / suggestions / plans is very inspiring.
As usual, your knitting is beautiful and precise. Your photos clear and concise. Lovely color, lovely wool. All much appreciated.
Thanks for sharing.
Susan
Comment by Susan Duncan — October 26, 2010 @ 11:10 pm
Oh, I can’t wait to see how this works out for you! I haven’t been impressed by most of the finished projects I’ve seen so far, though a few of them have turned out nice enough to give me hope that I’ll be able to knit something that I’ll actually wear.
Comment by Cheryl S. — October 27, 2010 @ 12:26 am
You’re making me want to start on *my* green sweater. Soon, soon. . . Thanks for sharing your thoughts & progress!
Comment by Pam — October 27, 2010 @ 2:23 am
I forgot to say that your illustration with the gray box really helped me understand the sleeve construction – now it “clicks”. I’ll have to print that and add it to my pattern.
At first, I was wondering why the top edge of the sleeve goes out horizontally for a bit before angling down, and wondering if that was to accommodate a shoulder pad, or to make sort of a puffed sleeve, but after thinking about it more, I guess it’s just to accommodate the top of the arm from the shoulder bone to the outer edge of the arm. I haven’t knit any drop-shoulder or modified drop-shoulder sweaters yet (though I’m starting a drop-shoulder one now). Usually the top edge of the sleeves on those just continue straight out horizontally, don’t they? That EZ was one sharp cookie.
Comment by Cheryl S. — October 27, 2010 @ 12:20 pm
Hi Susan,
That is a very nice sleeve. I am not sure how you did it, but it looks great!
Comment by Eryka — October 27, 2010 @ 11:43 pm
I get the “un-increasing” of the sleeve, but the underarm still has me a bit baffled. Maybe if I look at the diagram again tomorrow. . . .
Thanks for helping us all stretch our brains!
Comment by Deborah (aka Mt. Mom) — October 28, 2010 @ 1:14 am
I love your clear technical explanations of what you are doing. I have learned so much from following your blog. Thanks for sharing.
Comment by Astrid — October 28, 2010 @ 9:02 am
The other thing I love about my EZ Green Sweater is the square neckline with the mitred corners. Mitres going one way for he exterior portion and the opposite way for the interior hem portion. Aren’t we lucky EZ turned her brilliant brain to kitting. I mean she could have chosen rocket science or mathematician or some such.
Comment by Brenda — October 29, 2010 @ 11:54 am