Sally and I both have FO’s to share and fought over who would get to post first — YOU LOSE! It’s me! 😉
I did just get back from my trip – cut short by impending snow. It took me 5-1/2 hours to get there and I figured snowfall would make it an even longer drive home. My goal was to finish at least one project and I got close. I finished it at home on Saturday and Sunday.
When I received Tudor Roses in the mail, I was immediately struck by Elizabeth of York, the reimagined. It looked like a tapestry to me…richly woven fabric, careworn over time. I thought, “Hey, it’s a short vest! How long could it take?!?”
Answer: A long time! It was a slow-moving project to be sure. When I started it, I thought it looked like a muddled mess. I truly considered throwing in the towel. The two colors (Red Deer and Mountain Hare) are very close — one solid red, and one heathered salmon with reddish tones. The pattern took a while to emerge and until it did, I was unimpressed. My first realization that it had hope was when my husband walked in and commented on how beautiful it was. From a distance, the pattern is more clear and is really stunning.
Here is my Elizabeth finished:
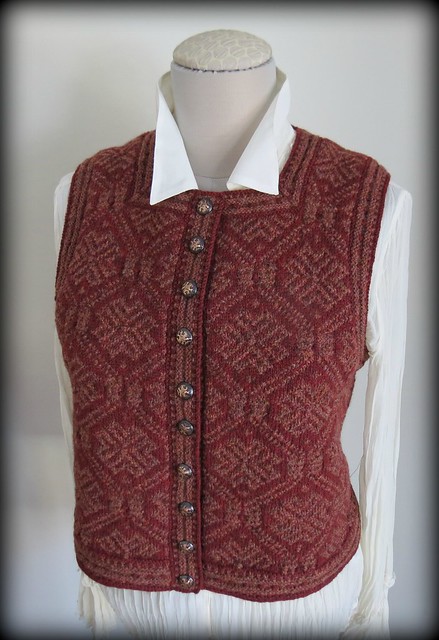
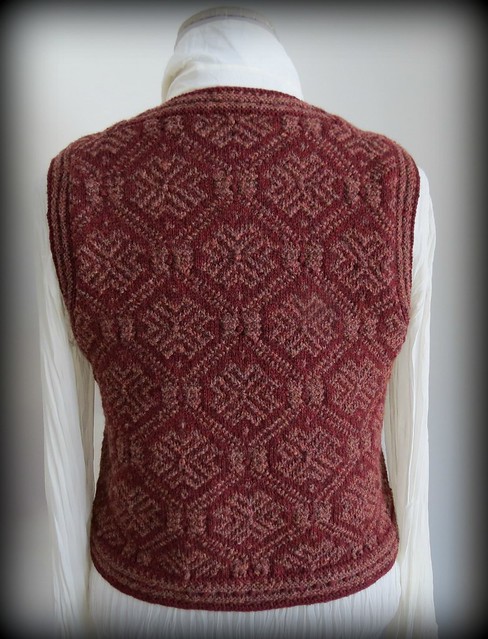
I made some modifications. The most significant is the profile. Let’s be honest – I have no waist. The original Elizabeth has a very small, fitted waistline and then increases to the bust. I made mine straight:
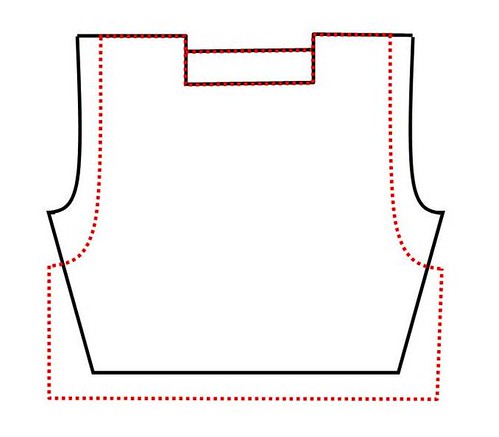
The black outline is the original shape while the red lines show my alterations. I cut in more for the armholes and made them deeper based on how I prefer my vests to fit. I think there was a mistake on the button bands in the pattern, so I improvised using the other bands as a guide. I tried every buttonhole in the book and could not get them to look right, so I kind of made up a buttonhole. And believe it or not, I had to go up at least 2 needle sizes to get Alice’s gauge! It still ended up a tad small but blocking did help.
For you steek lovers, here are the before and after shots of cutting:
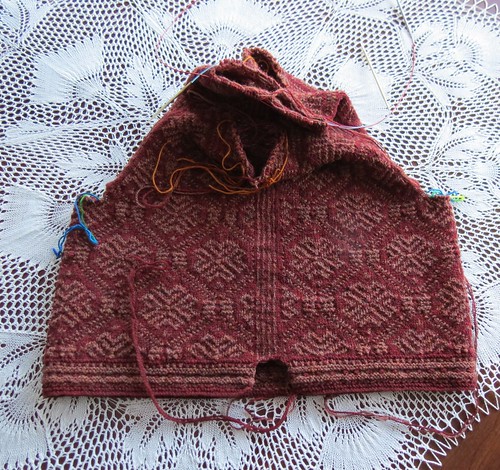
Before cutting
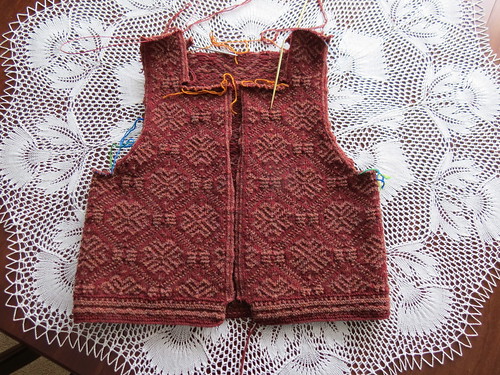
After cutting
Now that it’s done I can say that it was well worth it!


I can see what you mean in the before blocking pics; it does look kind of muddy. But it is GORGEOUS when finished!! You do such good work!!
Millie
Comment by Millie — January 27, 2014 @ 3:59 pm
Wow! It’s fabulous! I am still undecided about which pattern to make. My daughter likes that one best, but I am torn. I am not usually a vest wearer, but you tempt me awfully..
Comment by Joanna — January 27, 2014 @ 5:06 pm
Wow, whadda vest! Just perfect for this season, too, eh?
Comment by Linda — January 27, 2014 @ 6:40 pm
It is GORGEOUS!!! Really, it is so beautiful – wear or proudly. Pjs think it is a work of art!
Comment by Barb — January 27, 2014 @ 6:59 pm
Me again . . . That is supposed to say … I think it is a work of art.
Comment by Barb — January 27, 2014 @ 7:01 pm
This vest is so rich looking and does, indeed, look like a tapestry! This is so classic looking you will be able to wear for ever! Absolutely lovely! Can’t wait to hear more about the knitting retreat in WI. See you Thursday!
Comment by Kathy W. — January 27, 2014 @ 9:13 pm
Just beautiful!
Comment by Kym — January 27, 2014 @ 9:59 pm
Well, it’s been said — but still — it’s beautiful. I was hoping someone would “surprise” me with Tudor Roses as a gift, but I may have to break down and buy. I always have to go down several needle sizes for Starmore designs — painful sometimes.
Comment by Pam — January 27, 2014 @ 10:10 pm
I had sort of decided against purchasing this book since the one sweater I coveted was not in it. You are making me rethink that. Darn it.
Your vest is breathtaking.
Comment by Needles — January 27, 2014 @ 10:40 pm
Beautiful! I can’t wait to see it; we do need a show and tell. And, I can show my almost completed front of Na Craga.
And, the buttons are totally worth what it took to find them.
Comment by Susan — January 28, 2014 @ 1:02 am
Thanks for the inspiration. Beautiful pattern and beautiful craftswomanship.
Comment by Janet — January 28, 2014 @ 7:50 am
Ohhhhh Susan! This is stunning. And a perfect example for several conversations I’ve had lately about the design of posters & banners. What looks like a muddled mess up close becomes distinct & amazing when you step back a bit. Also related to my own stuff, in which I have my nose 2″ from it the entire time I’m working so all I can see is the mistakes, while everyone else sees the whole in its glory – at least I *hope* it’s glorious! – and this certainly is.
Comment by Suzan — January 28, 2014 @ 11:06 am
I love the Real Woman mods you’ve made. Many of the designs in this book seem to be aimed at the young and thin, but yours is a fine example of making it work for a different body shape. From your schematic it looks as though no extra yarn was required, is that so? I’m working on Katherine of Aragon which seems to retain the older, and for me better, shape from the original book, but with a fabulously reimagined color scheme.
Comment by Pru — January 28, 2014 @ 1:00 pm
No wonder we haven’t seen any wonderful projects from you for a while. This was worth waiting for – it’s gorgeous!
Comment by Mary Jo — January 28, 2014 @ 1:39 pm
That vest is absolutely beautiful — gorgeous. Love the colors you used. Wow!
Comment by Rose — January 28, 2014 @ 3:39 pm
Fabulous ! very nice modifications.
Comment by Samy — January 29, 2014 @ 3:30 am
Just received this kit in the mail! Now I really cant wait to start it. Yours is lovely.
Comment by LIsa — January 29, 2014 @ 11:43 am
It is lovely!!
Comment by monica — January 30, 2014 @ 1:31 am
I was told that you had a tip for making the buttonholes on the holy scarf on ravelry..I would make that scarf but I cannot navigate your blog!! Age related I am 78..so how do I find that wonderful tip? It was made using Kauni Special Effekt EQ Rainbow..again, thanks
Comment by marylou kavaler — January 31, 2014 @ 4:32 pm
Whew! Beyond my vocabulary …
Comment by Marny CA — January 31, 2014 @ 8:05 pm
I purchased the instructions for “Surrounded” via Ravelry and have a correction to provide but found no means of contacting you via the Ravelry website… so sorry to interrupt this conversation.
On page 3 of the pdf, all (RS) rows end with “sl 4 as to purl” and all (WS) rows start with “K6”. The result is that the yarn is on the front side of the next (WS) row. More over, if you change the (RS) row instructions to “bring yarn fwd, sl 4 as to purl”, then the resulting I-Cord Edging curls to the front, rather than to the back as on the other side.
The correction that worked for me is to change the (WS) rows to start with “P4 K2” rather than “K6” (and leave the instructions for slipping last 4 as written). As a result of this change, the yarn is on the correct (front) side of (WS) rows and the 4 perl stitches cause the I-Cord Edging to curve to the back as on the other side.
Having dropped from full to 3/4 time, I finally have time to knit again and am having fun using up yarn I’ve been collecting for years. This lap rope is a pleasure to work on. Thanks!
Comment by Beth Mercer — February 1, 2014 @ 8:55 pm
Love your style,Beautiful vest!
Comment by Sonja Loyd — February 2, 2014 @ 6:45 pm
Wow. Just wow.
Comment by Astrid — February 6, 2014 @ 5:36 pm
Loved this so much I ordered the book. It is a fabulous coffee table piece. I sure hope that I could make some alterations to the patterns as you have. Meanwhile, fabulous work that you have done. Another blue ribbon.
Comment by Louise T — February 14, 2014 @ 12:12 pm