
I recently completed my Japanese Pullover, and was very flattered by the reception it got on the blog. Here is a photo as a reminder of what it looks like:

I don’t know what the Japanese name is for the stitch I used, so I called it a Japanese flame stitch. Many of you asked how the stitch is made, and so with Susan’s chart expertise and help, I’m finally able to explain it to you. It’s generally charted in Japanese patterns as shown below. Typically, as the chart shows, it is done by “dipping down” three rows and temporarily increasing one stitch to three. It can, however, be worked over more rows and I’ve seen some patterns where the stitch count is temporarily upped to five.
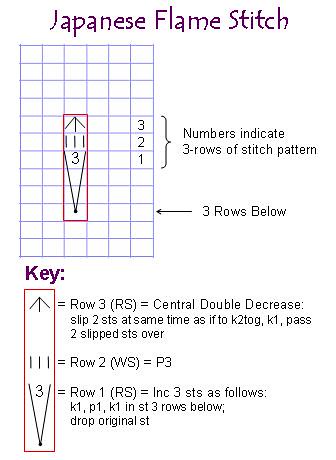
Here are some photographs to better illustrate what is being done. First, this stitch is started on the right side of the work and is done on a background of reverse stockinette. Look at the number “3” in the chart — that is the first row in which you do something different. When you get to the row that Susan labeled as #1, you work your way to the correct stitch, move your yarn to the back (b/c you are no longer purling), and increase by knitting, purling, and then knitting into the stitch three rows below). The first needle insertion looks like this:

Knit one stitch. It will look like this:

Move your yarn to the front and then re-insert the needle “through” the bump you went under the first time. It might be a little awkward but it can be done.

Purl.

Then move the yarn to the back and knit as you did with the first stitch.
Now, the next step is really important but it’s easy to forget: DROP THE NEXT STITCH FROM YOUR NEEDLE.
The “next stitch” is really the same stitch you’ve just knit into three times. If you don’t drop it, you’ll accidentally increase the number of stitches in whatever you are knitting. The dropped stitch will eventually run back the three rows on its own, but it can’t go further because you’ve knit into it three times. Remember, so you don’t hate yourself several rows later when your chart is screwed up, DROP THAT NEXT STITCH. Alrighty, then.
On the following wrong side row, purl the three stitches you just made. (Note: the other stitches will be knit because you are working reverse stockinette.) Then purl your way to the three new stitches. Your knitting should look like this:

At this point, you work a central double decrease as described in the chart above.

Then continue with reverse stockinette.

That’s all there is to it!
(Ack! Ignore my hands in these photos — I can’t take very good care of them right now although they were happy for a few minutes of being out of the splints.)


What a gorgeous sweater. Thanks for the tutorial.
Comment by Gale — April 18, 2008 @ 12:11 pm
OH MY GOOOOOOOOOODDDDD!!!! That is gorgeous!
Comment by Kelly — April 18, 2008 @ 12:42 pm
Sally- I’ll have to go over that a few times before it sinks in.
That’s an incredibly beautiful creation. Well done.
Comment by Lorraine — April 18, 2008 @ 12:47 pm
Fabulous!
Comment by Miss T — April 18, 2008 @ 1:45 pm
Oooh – can’t wait to get the needles out and recreate the stitch! Thanks for the tutorial.
Comment by Soo — April 18, 2008 @ 2:17 pm
Is there a “place” where you learn such things?! I think I should stick to Fair Isle!
Comment by Marina — April 18, 2008 @ 3:11 pm
That is truly such a gorgeous sweater. I’m going to practice that stitch and see if I can even come close. OMG woman! I’m drooling…..
Comment by Pam/2muchfun — April 18, 2008 @ 3:55 pm
Thanks for the demo. That really is an extraordinarily beautiful sweater.
Comment by technikat — April 18, 2008 @ 4:13 pm
More thanks for the tutorial. This is just gorgeous!
Comment by Marji — April 18, 2008 @ 4:46 pm
beautiful! Thank you for the tutorial. This one is a keeper. I came by via one of the Yarn Harlots fans site.
Comment by KSee — April 18, 2008 @ 6:09 pm
That’s just amazing. I can barely comprehend it. The sweater is beautiful. Can we expect to see it (and you) at the Md S&W?
Comment by Trudy — April 18, 2008 @ 6:45 pm
Fabulous sweater, and very nicely laid out tutorial. Thanks for sharing both.
Comment by twinsetellen — April 18, 2008 @ 6:50 pm
That sweater is so very beautiful. Your work is truly amazing Thanks for the lesson and the picture (again).
Comment by rudee — April 18, 2008 @ 10:44 pm
Absolutely gorgeous! I am anxious to try the stitch…Thanks for sharing.
Comment by JaneOC — April 19, 2008 @ 2:53 pm
Thanks so much for posting the instructions. The sweater is out of this world. I just loved your photos of it earlier with the flowers. It was snowy and not pretty outside–made me hopeful of spring. And of knitting beautiful things.
Comment by Delores — April 19, 2008 @ 7:34 pm
Thank you! That is gorgeous. Would you be willing to graph out the rest of the stitch pattern, too?
Comment by Astrid — April 24, 2008 @ 4:05 pm
Thanks for the tutorial. The sweater is gorgeous!!!!
Comment by Thomasean — April 25, 2008 @ 12:01 am
OMG what a gorgeous sweater! Thanks for the info. Is the pattern from a Japanese knitting magazine? Just beautiful.
Comment by sun — April 12, 2009 @ 12:55 pm