
There are so many fabulous striped shawls and scarves available now, aren’t there??! They are so popular and fun to knit.
A new person to our knitting group was working on a striped shawl that had a background color with periodic stripes of a contrasting color. I showed her how to start the new color without an end to weave in and said, “You can avoid an end when you start the color, but there will be always be an end to weave in when you stop it.” That bugged me! Why does there need to be an end at the end??
So, I came up with a way to eliminate the pesky ends in striped shawls and scarves. The only end I couldn’t get rid of was the bind off!
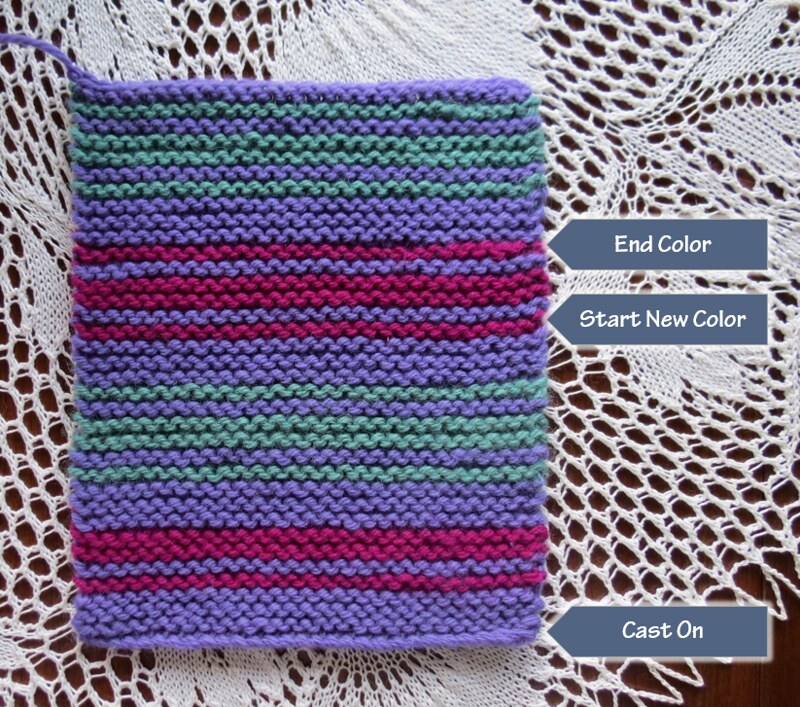
This is a small sample that shows the way it looks, with no ends as you knit along. Is the [right] edge perfect? No, but if there were a bunch of ends woven in it would look a lot worse!
I do variations on splicing to eliminate the ends. I spit splice almost every fiber I knit with. Superwash, singles, cotton, etc. There have been very few times over the years when I have been unable to successfully splice my yarn. One annoying exception is some of the beautiful hand painted yarns that we love. Sometimes the color does not penetrate all the way through, so the inside is white. When you split off the plies, the white can show. Then you might get the barber pole effect.
I splice when I add a new ball of yarn, add a new color, and sometimes when I cast on, but I don’t use it all the time — there are times when I want an end.
Regular splicing works when joining in a new ball of yarn in the round and the Russian Join for color changes, but the starting and ending of the new color that I demonstrate is not really meant for working in the round. It would leave a hole in your knitting, plus you have a place to hide the ends on the inside. But it is another technique to have in your toolbox!
I taught this as a Pop Up a the Yarnery last weekend and 40 people showed up, so I decided to put together a YouTube video so others could check it out. It is too long and I tend to ramble (and hate hearing my voice!!), but it does show the different techniques. In the video I use water to moisten the yarn, but in real life I usually suck on the ends! I wanted to look more refined and classy in the video!! 🙂
There is a picture of a written chart that may be hard to see. Click here for a pdf copy: Minimizing Ends in Knitting.
And thanks to Gretchen for the timely information about YouTube videos!!
PS to Celeste re: Pop Up class — we held two separate sessions with about 20 people per. I did demos on the “end the color” technique for 4-5 people at a time with them standing behind me. It worked!
PS2 to o-stephanephanie: O-stephanephanie asked about this technique in fair isle. Fair isle is knit in the round, so I don’t use the half Russian join. What I do to eliminate ends in a pullover or on the sleeves would be to either do a standard splice (as I do when just changing to a new ball in a project) if the color change flows from one to the other. If the color change is abrupt, I would do a standard Russian join. I show what this looks like in this post. And as the post states, I didn’t even bother with a Russian join on the underside of the sleeves – I just spliced.
PS3 to Jennie – Jennie mentioned my assurance that by twisting the yarn as you go that these methods work with all yarns. I can only guarantee that this works for me!! I have been doing this for years with all kinds of yarn, so I know it works, but everyone is different and you may be knitting with yarn I have never tried. So, be aware that objects in the mirror may be closer than they appear!!!


Thank you so much for posting this tutorial. I had received the email from the Yarnery about the Pop Up class, but with three Littles at home there was no realistic way for me to make it. And I was rather bummed about that. Now I want to start a new project just so I can practice these techniques!
I’m happy to hear you had such a great turn out for the class. I’m curious how the team managed to fit everyone in for it 😉
Comment by Celeste — April 6, 2016 @ 11:45 pm
Thank you! Love this. Elegant and very clear video. Seems to me this would also work well for changing colors on a stranded yoke.
Comment by Fieldstone — April 7, 2016 @ 6:43 am
Thank you! I recently finished a shawl with lot of ends. The next shawl will NOT have tails hanging everywhere!
Comment by Mary Jo — April 7, 2016 @ 10:20 am
Thank you for the clear video, audio and printed explanations. In addition to being an excellent knitter, you are a very ingenious and generous one. I don’t often knit stripes but will use these techniques for dealing with same-color ends on large multi-ball/skein projects like afghans or sweaters.
Comment by Nancy — April 7, 2016 @ 12:48 pm
Wow! This will really make a difference in my knitting. Thank you!
Comment by Mary Jo — April 7, 2016 @ 1:40 pm
You are a wizard, woman! Thank you for teaching me yet another great technique. (By the way, your voice is lovely and warm – so fitting for the persona you present in your blog…)
Comment by Emm — April 7, 2016 @ 3:24 pm
I am on the Yarnery mailing list altho I live in NJ so I was very jealous to read about your pop up class. Thank you for sharing this technique.
Comment by Patti — April 7, 2016 @ 5:51 pm
Extremely helpful. Thank you!
Comment by Judy — April 7, 2016 @ 7:25 pm
Thanks for posting this Susan! I really do not like weaving in the end at the end of my work but will try these methods! These are so much neater! You did a great job too!
Comment by Connie Portlas — April 7, 2016 @ 9:06 pm
Have knit so many stripes in recent years! Thank you for sharing a clever technique. I’ll certainly give your methods a try the next time stripes come around.
Comment by CreeksideKnitter — April 8, 2016 @ 1:37 am
Wonderful tutorial! Just curious though – do you use this technique when knitting fair isle? I usually try to knit fair isle cardigans which takes care of the ends on the body, but the sleeves are another story. And some fair isles I have never fully woven the ends in. But I’m getting ready to start Henry the Eighth as a gift so I can’t be so free-spirited about the ends. Thanks!
Comment by o-stephanephanie — April 8, 2016 @ 6:45 am
Fantastic! Thank you!
Comment by sunriseknitter — April 8, 2016 @ 10:12 am
Very helpful and timely. I just started a poncho and I’m incorporating stripes along the side. I HATE weaving ends in and this method is working beautifully. Thank you!!
Comment by Sherri — April 8, 2016 @ 10:23 am
Thank you for sharing this illuminating video on joining techniques! I can see using these in weaving as well as knitting!
Comment by Mary Lou — April 8, 2016 @ 5:17 pm
So simple yet so brilliant! Thank you for sharing this with us!
Comment by Natalie — April 8, 2016 @ 6:39 pm
Instant classic knitting resource! Thank you for publishing a video. I’m excited to add these techniques to my knitting repertoire.
Comment by Alison in MN — April 10, 2016 @ 10:23 am
Thanks for the timely tutorial. I just started On The Spice Market Shawl – lots of stripes. I’ve used the traditional Russian join in the past using a needle to weave the tail back on itself. Your wet splice should speed up this process for me. Thanks for sharing your knowledge and expertise!
Comment by Ruth — April 10, 2016 @ 11:23 am
This is excellent, Susan. So helpful. I’ve also used a Russian join with a needle, but I like your method. I also appreciate your insistence that it doesn’t matter what kind of yarn you have as long as you keep twisting!
Comment by Jennie Fields — April 10, 2016 @ 3:22 pm
I’d love to see what you could do with Ravenscliffe, by Annie Hamilton. It’s available on Ravelry. Her’s is gorgeous, which makes me wonder what yours would look like.
Comment by Judy — April 10, 2016 @ 5:53 pm
Thank you so much for this tutorial and I appreciate you taking the time to do this. It’s brilliant! I shall be using these techniques immediately.
Comment by Melody — April 14, 2016 @ 9:37 pm
I am interested in taking a class on entrelac felting- specifically doing the felted bags. Would love to know in the twin cities where I could find such a class.
Comment by Betsy Guthmann — January 8, 2018 @ 10:45 pm