
We tried yesterday to post our tip of the week on The Rainey Sisters Ravelry Group. It just would not work! The middle half would not show up. So, here it is:
March 4, 2018 Tip of the Week
In our counting rows Tip of the Week video, we used the lifted increase. We received some questions about that so we thought we could add it as this week’s tip. It is always nice to have several tools in your knitting toolbox so you can use the best technique for the situation.
Lifted Increase: These increases knit into the left or right leg (left leg of st –> V <– right leg of st) of the stitch in the row below. They are easy to do and fairly invisible. Like all increases, they can create some stitch distortion, but when spread out as in sleeve increases, it is minimal. To reduce distortion, do not lift the yarn onto the needle, but simply knit the stitch in place. We call the right leg lifted increase RLI, and the left leg is called LLI.
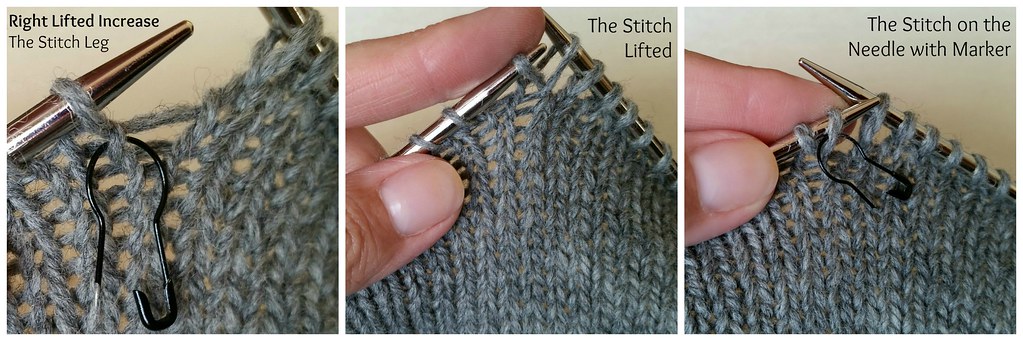
RLI:
Knit to the position of the next increase. The right leg we will use is shown with a marker in the picture below. Lift the right leg of the stitch in the row below, place it on the lefthand needle, and knit it like a regular stitch. Then knit the stitch that is was next in line to be knit. One stitch increased.
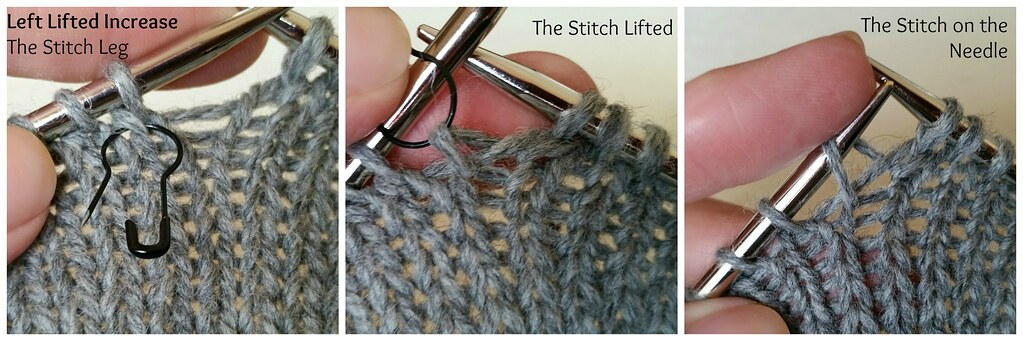
LLI:
The left leg of the stitch below can only be reached after knitting the next stitch on the needle. This appears to place it one row lower than the RLI, BUT it really is in the same row as the stitch used to create an RLI. The marker in the picture below is placed on the left leg of the stitch we are going to use BEFORE we knit the next stitch on the needle. If you have trouble finding this when you are first trying to use this increase, keep the marker in place until you complete the inc. Lift the left leg up and then knit it through the back loop because of the way it is positioned. You do not want to twist the stitch. One stitch increased.
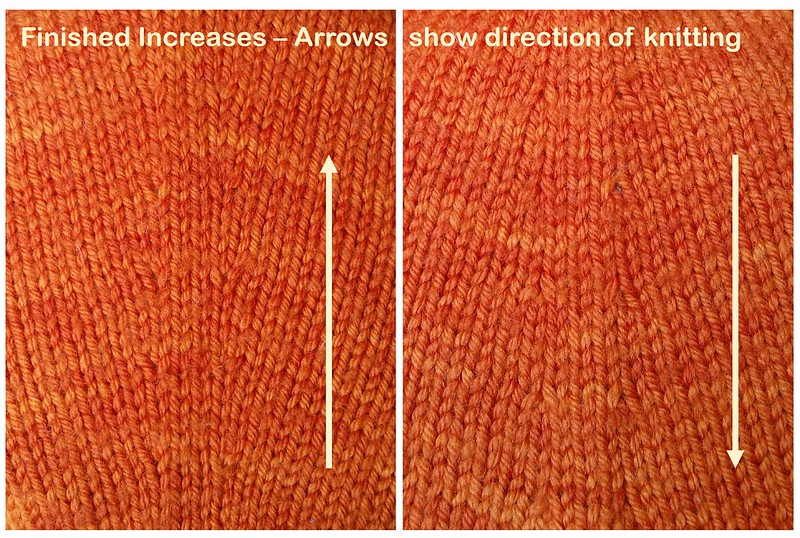
The following pictures show the increases in the same direction they were worked (“right side up” shown with up arrow) and also “upside down” shown with down arrow. The really cool thing about these increases is that they look like k2tog and ssk decreases from the other direction! This means that topdown sweaters with increases will look like regular decreases when being worn – crazy!
There are of course many youtube videos and other sources for information about these increases.
PS to Robin F. — Knitting terms are not always consistent, but we tend to think of a knitted make one “m1” (left or right) as lifting the running thread between two sts and knitting it with a twist (see PS2 for more). This increase causes stitch distortion to the sts on either side AND to the sts above it in the next row. To avoid this, you can do a YO in place of the m1 and twist it on the following row. Of course, repeating m1’s stacked row after row (as in raglan shaping) can be a pretty design element.
PS2 to Shiphrah99: You are right — left and right m1’s are determined by how you seat the running thread (RT) on the needle. A right slanting m1 is made by lifting the RT with the left needle tip from back to front and knitting the st. A left slant is created by lifting the RT from front to back and knitting it through the back loop. The lifted increases we are showing are another type of increase.


You two are amazing!
Comment by Marlys m — March 4, 2018 @ 3:13 pm
This is how I always do M1- I taught my knitting students this method but couldn’t find video for them to watch when they forgot how to do it- now they have your pix. Thanks
Comment by Robin F — March 5, 2018 @ 10:05 am
Ohhhhhh! All this time I thought it was the strand of yarn *between* the stitches and the lean was determined by whether I entered that strand from the front or the back. (Maybe that’s a different technique???) This is MUCH easier!
Comment by Shiphrah99 — March 5, 2018 @ 11:36 am
I know that terms are interchangeable. When I started doing lace and raglans- I used the method you show here. I thought I invented it in 1990! LOL. I’m a combination continental knitter so I have to interpret some patterns. Thanks for the pix.
Comment by Robin F — March 6, 2018 @ 3:37 pm
Thank you for posting this! It was wonderfully timed, since I was struggling to make the suggested increases on a knitted toy with bamboo/cotton yarn at tight gauge. I switched to using these lifted increases and my life got infinitely easier! I also didn’t have to worry about mixing up the M1L and M1R. Thanks for making my knitting life better 🙂
Comment by Natalie — March 15, 2018 @ 8:17 pm
I am really late on this, but I was out of town. I always did lifted increases like this until a couple of years ago when I made Emerson by Brooklyn Tweed and they had a slight variation: lift the stitch below as you describe it, and knit it, then SLIP the actual stitch (the one that is not lifted) and carry on. It makes the two stitches grow symmetrically out of the row below and reduces that tiny bit of distortion, so that the line of increase is just a bit straighter. One of those little genius things that I had never thought of!
Comment by Ellen — March 17, 2018 @ 9:42 pm