theraineysisters knitting and so much more

April 18, 2008

From Sally — Japanese Flame Stitch

Filed under: Japanese Ironwork,Knitting Tips — surly @ 12:04 pm

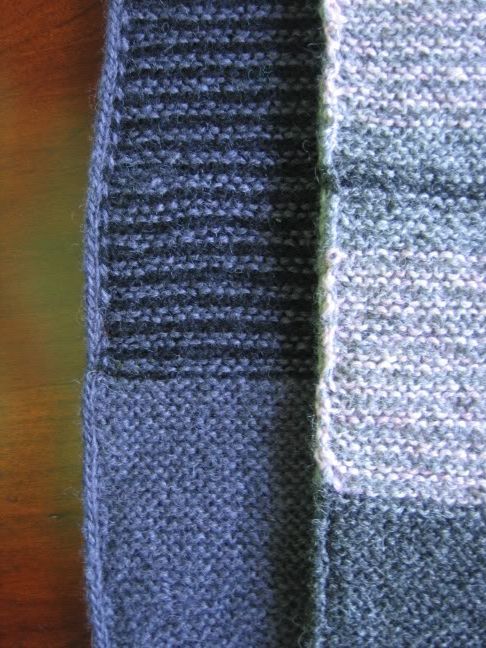
I recently completed my Japanese Pullover, and was very flattered by the reception it got on the blog. Here is a photo as a reminder of what it looks like:

I don’t know what the Japanese name is for the stitch I used, so I called it a Japanese flame stitch. Many of you asked how the stitch is made, and so with Susan’s chart expertise and help, I’m finally able to explain it to you. It’s generally charted in Japanese patterns as shown below. Typically, as the chart shows, it is done by “dipping down” three rows and temporarily increasing one stitch to three. It can, however, be worked over more rows and I’ve seen some patterns where the stitch count is temporarily upped to five.

Japanese Flame Stitch

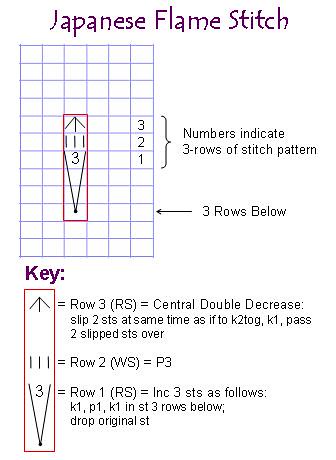
Here are some photographs to better illustrate what is being done. First, this stitch is started on the right side of the work and is done on a background of reverse stockinette. Look at the number “3” in the chart — that is the first row in which you do something different. When you get to the row that Susan labeled as #1, you work your way to the correct stitch, move your yarn to the back (b/c you are no longer purling), and increase by knitting, purling, and then knitting into the stitch three rows below). The first needle insertion looks like this:

Knit one stitch. It will look like this:

Move your yarn to the front and then re-insert the needle “through” the bump you went under the first time. It might be a little awkward but it can be done.

Purl.

Then move the yarn to the back and knit as you did with the first stitch.
Now, the next step is really important but it’s easy to forget: DROP THE NEXT STITCH FROM YOUR NEEDLE.

The “next stitch” is really the same stitch you’ve just knit into three times. If you don’t drop it, you’ll accidentally increase the number of stitches in whatever you are knitting. The dropped stitch will eventually run back the three rows on its own, but it can’t go further because you’ve knit into it three times. Remember, so you don’t hate yourself several rows later when your chart is screwed up, DROP THAT NEXT STITCH. Alrighty, then.

On the following wrong side row, purl the three stitches you just made. (Note: the other stitches will be knit because you are working reverse stockinette.) Then purl your way to the three new stitches. Your knitting should look like this:

At this point, you work a central double decrease as described in the chart above.

Then continue with reverse stockinette.

That’s all there is to it!

(Ack!  Ignore my hands in these photos — I can’t take very good care of them right now although they were happy for a few minutes of being out of the splints.)

March 6, 2008

From Susan — Little Plain Jane

Filed under: Knitting Tips — lv2knit @ 12:14 pm

Sally has been wowing the knitting masses with her stunning Japanese knitting.  I have not been wowing or Japanese knitting or anything exciting like that .  I did think I would share the final chapter of the scarf I made.  I “borrowed” an idea I heard about from a reader of Grumperina’s blog.  I am not a reader of her blog, but someone told me that when she gives socks away, she makes a label for them.  I thought that sounded like a cute idea for my scarf, and thought I would share it with you:


The picture in the background is me with Grandma Thelma — she made the dress I’m wearing

I included a picture of the scarf being worn so the recipient will understand my “motivation.”  I also included care instructions so it will not get washed and dried in the machine .   I printed the label on high quality photo paper.

Because the rolled up scarf was too big for the label, I tied it in the back with leftover yarn:


The color shown here is very true.  So, there you are.  I think it makes a pretty cute little gift and hope the recipient enjoys it. 

I wish I had a knock out to show you like Sally has been working on — maybe the next time!

February 2, 2008

From Sally — More Sleeve Avoidance

Filed under: Knitting Tips,Sally's Kauni — surly @ 6:38 pm

It’s too bad I never wear vests because I really am not of a mood to knit the sleeves on my Pearl Buck cardigan. So, in addition to a bit of stealth knitting, I’ve gone back to my damask Kauni, which I started in a burst of enthusiasm and then set aside. It’s just what I have been in the mood to knit the last couple of days, however. Here is how it is looking.

I’m getting to the point where I need to figure out exactly how long I want it so I can decide where to start the armholes (which means dreaded future sleeves). I also need to decide what kind of neckline I want. To that end, I made some graph paper to my gauge and charted the pattern again onto that paper. Then I used that as a kind of stencil — making multiple copies of the pattern repeat. Now I’ll cut and paste my sheets of graph paper together so that I have a paper duplicate of my sweater upon which I can plot out the neck. Doing it this way makes it easier for me to make sure that I’ll start the neck shaping at an attractive place in the pattern.

December 9, 2007

From Susan and Sally — Why Add I-Cord to Ballerina??

Filed under: Knitting Tips,Sally's Ballerina — Both Sisters @ 1:27 pm

Laura wondered about the i-cord on Ballerina, “I am not clear on why you added the i-cord to the bottom edge since there is already a knitted-in i-cord finish to it.” 

Susan answered this question in an old post here.  Basically, it is because the built in i-cord is not very attractive from the inside*.  With a swing coat, like Ballerina, it is possible that the hem will show because the back is longer than the front.  Doing applied i-cord afterward makes for a better looking finish:

Ballerina007.jpg picture by lv2knit
Susan’s Mermaid at top of photo, Ballerina at the bottom.

*PS from Susan: I should clarify: Hanne’s built-in i-cord is not very attractive from the inside — she does it this particular way in order to have single color i-cord at the hemline even though you are knitting 2-color stripes as shown in Mermaid above.

In general, it is absolutely easy to have built in i-cord on either edge of a garter stitch strip of any width:

For a 3-stitch i-cord edge on ONE side of garter stitch:
Row 1: knit to last 3 sts, bring yarn forward, slip last 3 sts to right hand needle one by one as to purl; turn
Row 2: knit

For 3-stitch i-cord edge on BOTH sides of garter stitch:
All Rows: knit to last 3 sts, bring yarn forward, slip last 3 sts to right hand needle one by one as to purl; turn

November 15, 2007

From Sally — Some Quick Notes on Ballerina

Filed under: Knitting Tips,Sally's Ballerina — surly @ 4:01 pm

I’m not sure this post will make any sense to someone who hasn’t knit or isn’t in the middle of knitting a Falkenberg Ballerina, but here goes anyway. In my update yesterday, I showed the raglan edge between the back and the right sleeve before the stitches were re-activated. Here it is again so that you don’t have to scroll:

Falkenberg has you alternate between reducing one stitch and two stitches through short rows on the raglan. It’s easy to keep track of where you are (and whether you need to be deactivating one stitch or two) because they clump together. If you’ve just deactivated two stitches, for example, you’ll see what looks like three stitches in a clump: the yarnover (which Falkenberg uses instead of a wrap) and the two stitches. Alrighty then. When you are working on the other side of the raglan line, you are “increasing” through short rows. Again, you either add 1 or 2 stitches. The problem is that when you are increasing stitches through short rows you knit past your last increase on your way to do the new one. It’s harder, therefore, to see what you’ve just done and remember if you are supposed to go up by 1 stitch or 2. I’m easily distracted, constantly interrupted, and I’m working with black yarn. (Note: on the sleeve side of the raglan edge, all of my stitches are black so I can’t just use the color change as a guide, which I will be able to do on the raglan side of the right front when I am increasing stitches there.)

My sister Susan came up with a clever way to keep track: she wove a contrast yarn around the stitches before she started the short rows. That made the knitting itself much more mindless. Here’s the method:

First, in addition to increases up the raglan via short rows, you are supposed to be increasing stitches at the other end of the knitting to form the sleeve. Falkenberg makes three stitches out of one to increase two stitches (instead of using short rows). Susan and I both wanted to be able to do a three needle join of the sleeve seam. So, before starting the raglan short rows I did a provisional cast on of all of my sleeve stitches using a contrast yarn. Then I knitted one row from the cuff edge to where the stitches would join the armhole and the raglan. At this point, things looked like this:

Then I wove a contrasting yarn through the raglan stitches.

Then I could start knitting, increasing on both sides. The blue yarn tells me to stop and turn. It’s mindless, and I don’t need to remove the blue yarn as I go.

I’m sure this probably sounds incomprehensible unless you’re knitting one of these; I apologize. As a reward for making it through this painfully boring blog entry, here’s a touch of fall.

November 2, 2007

From Susan and Sally: Answers to Ballerina Questions

Filed under: Knitting Tips,Sally's Ballerina — Both Sisters @ 10:55 pm

Several of you had some questions about Ballerina, so we will attempt to enlighten and clarify:

From Susan to Judi P in Cleveland : I love my Ballerina and wear it frequently — sans button!  I suffer from “lack of waist” syndrome so I wear it over a jumper.  It never slips off my shoulders, never needs adjustment.  When I went on the Shop Hop three weeks ago, Rosanne was one of my travelling peeps and she wore her Ballerina — it’s exactly like the one Sally is knitting.  She never tugged or pulled, and it looked fantastic with black slacks and black turtleneck — she also wore a stunning necklace.  Sally started hers at this time because I described how great Rosanne looked wearing hers.  So, there are a couple of real life testimonials!

Check out this source for great pricing on Ballerina:
Cucumberpatch

Warning!!  Hanne just introduced a new design that looks like a cross between Sunrise Circle and Mermaid called Gloria — quite cute (Cucumberpatch for Gloria).

From Sally: Several people have asked me about the basting along the bottom of my Ballerina:

It’s not basting. I’m marking the ridges where I’ve made increases with a contrasting piece of yarn. Ballerina is short in the front, and it gets longer as you work your way around to the back. You start knitting with the left front. I’ve marked each ridge where I’ve made an increase so that when I start decreasing as I work towards the right front, I can decrease on the same ridges. In other words, it’s an easy way for me to try to make each half of Ballerina identical. I use the same method for marking increases on sleeves or increases/decreases for waist shaping.

Susan uses the same method. She described it here. Basically, when you get to an increase row, you “lay” a different colored yarn over the running thread between two stitches. Then you knit, which traps this yarn in place. It’s quick and easy and, if you forget to lay the yarn across the running thread until you are halfway through the row, you can pull it through with a crochet hook on the next (WS) row. When the garment is finished, you just pull it out. 

Another question was whether one wraps for the short rows. That’s a little more complicated. Falkenberg’s directions tell you to do a yarnover, rather than a wrap, for short rows. You knit to the turning point. (Remember, you are knitting garter stitch.) You turn. Instead of putting the yarn to the back, if you just knit the next stitch you create a yarnover. When you activate the stitches, you knit that yarnover with the following stitch and all is well.

BUT: I have found that other methods are sometimes prettier and you just need to experiment. For example, when I did the sleeve increases, I did nothing at all. No wrap, no yarnover. Why? Well, when you first knit the new stitches (to increase the number of sleeve stitches),* you are knitting on the wrong side. When you activate them, you are knitting on the right side. When I did these short rows using Falkenberg’s yarnover method, it just didn’t look right because the YO shows on the RS. It looked better doing nothing. (I have found this to be true in general with seed stitch as well as garter.) On the other hand, when you are activating stitches on the right side of the fabric, Falkenberg’s method looks great.

With the black yarn I’m using, you could use Falkenberg’s method and it would work; I just liked my method better, at least for the sleeves.   From Susan: I used Hanne’s method on my sleeves and did not like it for the reasons that Sally describes.  But it does look okay when you activate the sts from the RS.

From Susan: Another good method for garter stitch short rows is to wrap the stitch as usual for short rows but don’t pick up the wrap when you come back and activate the sts.  The wrap mimics the look of a garter stitch ridge perfectly.

*I had placed all of the sleeve stitches on a needle first through a provisional cast on and then added them in; I was not following Falkenberg’s directions.)

PS to Marina: I do not expect to knit Gloria: I already made both Sunrise and Mermaid, so I do not feel compelled (at least for the time being) to make Gloria!  But who knows??? 😉

October 31, 2007

From Sally — My Little Assistant Is Haunting Me (and so is a Ballerina)

Filed under: Knitting Tips,Sally's Ballerina — surly @ 10:50 am

Now that the first rush of excitement of our Roslin Hoodie pattern is past, and quick before we find any more mistakes, let’s get back to our regularly scheduled knitting and blogging.

I love Halloween — for some reason it’s always been one of my favorite holidays. Mayhaps it’s the candy. I usually carve a few intricate pumpkins, but I confess that this year’s are a little dull:

Fortunately, someone in the wilds of Colorado has been taking up the slack. Remember my little assistant? Here’s a refresher photo for those who don’t:

He’s been immortalized in a Halloween pumpkin by my daughter’s boyfriend. I think he may have found his true calling; it captures Batman perfectly.

As for knitting, I’ve embarked on another Hanne Falkenberg: Ballerina. I’ve had this kit for some time, and suddenly got interested in it when I finished Mermaid. I needed a portable project — my Kauni skeins are too large to carry around. Well, all I meant to do was get it “started,” but I got carried away. I’m just over halfway finished with it already, although I suspect my progress will now slow considerably.

Here are a few shots. First, Lucy is modeling it and wishing I would provide her with some kind of undergarments:

Here are some other shots that show the color and the pattern a little better. I was surprised, based on the photos I’d seen of this jacket, at just how many stripes there were on the sides. That part was a little sl-o-o-o-w.

For some reason, I’m finding this to be a more enjoyable knit than Mermaid — I’m not sure why. One reason may be that you are forced to knit the sleeves as you knit the body, so I know I won’t be faced with the drudgery of sleeves when the project is almost, but not quite, finished. It’s also a very clever design. As you finish the front, you knit one row of a garter ridge (which is always two rows) from the bottom to the neck edge, quickly (ha!) knit a sleeve, and then go back down the garter ridge and finish it. There is thus no side seam — you just keep going. You are supposed to go back later and seam the sleeves.

My clever sister Susan, who made Ballerina earlier, figured out an easy modification that allows you to join the sides of the sleeve in a three-needle bind off as you are knitting so that you don’t even have to go back later and do that bit of finishing. Instead of doing the sleeve increases as Falkenberg directs (by stitch increases), you do a provisional cast on of all the sleeve stitches and increase using short rows (as you do for the raglan shaping, etc.). Then, as you finish the last row of the sleeve, one side of the sleeve is already on a needle. You remove the provisional cast on from the other side and put those sleeve stitches on a second needle, and do a three needle bind off as you knit the last sleeve ridge. It’s brilliant and easy and eliminates finishing. I’m so glad she knit this first.

October 5, 2007

From Sally — What A Tangled Yoke We Weave

Filed under: Knitting Tips,Tangled Yoke — surly @ 11:26 am

What is this thing called a finished object? It seems like it’s been a while since we had one. My Tangled Yoke Pullover Not a Cardigan is finally off the needles. Yay!

I have a feeling it’s not what some of you expected it to look like. First, I’ll show the photos and then explain why and how I did what I did. (It’s a hazy odd day out; I had a lot of trouble getting decent photos. This yarn changes color depending upon the light, which is very noticeable here. The sideways photo is the truest to color.)

The grafted under arm:

As you can see, I chose to do a Henley style neckline — preserving the split at the front of the cardigan. I went through a lot of options when I decided to make this a pullover.

1. Have the front and backs identical. If you look at the photos of the back, you can see there is a transition point where the asymmetrical cables go out towards the front. I thought I might be able to duplicate that in the front, but it’s not really possible without a lot of fiddling and changing of stitch counts.

2. Simply have the main cable pattern repeat all the way around the neck. I seriously considered this possibility. Mathematically, it would have been very easy. It’s a ten-stitch pattern repeat (that increases and then goes back down to ten). I had 230 stitches, so I wouldn’t have had to make any adjustments. I would have chose one of the two basic cable repeats and been on my merry way. The issues were these: what part of the cable pattern would I use to center and would it be tricky to deal with the inevitable “jog” you get between rounds in circular knitting? I would have started the rounds on one of the shoulders to minimize the jog. My bigger issue was where to center the pattern and whether I would like the way it looked. I did a lot of futzing with photographs etc. and decided I wasn’t sure I wanted the look I was going to get.

3. Keep the pattern the same but not split the neck. I would have had a fairly large expanse of plain stitches between the bobbles that complete the pattern. I could have adjusted that by reworking those so that they came out more towards the middle. I think that would have looked fine, but I ultimately decided I sort of liked the Henley split look.

What did I do? I cast on the same number of stitches for the front and back. In my case, it meant I cast on four more stitches than the pattern called for. I worked the sweater in the round, but other than that I pretty much followed the original directions up to the yoke. (I did originally knit the purl seam stitch, but I “undid” it as I explained in an earlier post.) After I joined the sleeves to the body, I tried it on periodically until I thought “Okay, here is where I want it to split.” I then put four stitches on a holder and at that point started knitting back and forth.

I also knew that I wanted a wider, lower neck than the cardigan had and I wanted the cables to sit lower. I wanted them to wrap around my shoulders. When I had knit about 1 1/2″ and just after I split the neck, I did a set of short rows. (There are none called for at that point in the pattern.) Then I knit straight up, but started my cabling sooner than the pattern called for. There is a decrease round immediately after the cabling. I waited to do that because it would have been too soon to do those with my changes; the sweater would have been too tight and it would have pulled up. After I did the decrease row, I did a second set of short rows (approximately where called for in the pattern).

For the neck, I did an inch or so of garter rib and left the stitches live. Then I picked up stitches along the split on each side and knit garter rib. I bound off the neck and split stitches together using a two-stitch i-cord. One note: if you do a split neck like this, make sure you knit the band that goes along the split long enough or it will pull when you stitch it down. Although I had four stitches on a holder (which I grafted to the edge of the garter rib), I really needed to make sure my ribbing was long enough to cover six stitches because I lost one on each side of the neck when I picked up.

I’m really happy with how this turned out, although there were moments when I had my doubts. It fits perfectly. It’s one of those sweaters that actually looks better on me than on Lucy because I have shoulders and she doesn’t. I tried to take some photos of myself in it, but they just didn’t turn out.

If only my little assistant were here to help. Oh look! He’s trying to swim to me!

I think it will be a long wait.

The yarn felt scratchy before I blocked it, and I was worried about that. I put a few drops of my heavy duty conditioner in my soaking water (the same conditioner I use when I blow dry my Krusty the Klown hair straight), and it feels much softer now. The sweater has a nice drape to it and if it ever cools off here in DC, I have a new fall sweater.

October 2, 2007

From Sally — Tangled Yoke Redux

Filed under: Knitting Tips,Tangled Yoke — surly @ 9:20 am

As I merrily plow ahead with my Tangled Yoke, I thought I’d share one of the changes I made. The instructions, which are for a cardigan (I’m knitting this as a pullover), call for you to knit the entire piece (back and fronts) back and forth with a purl stitch running from the hem to the under arm to give the look of a seam. I did that, but wasn’t sure I liked how it looked. So, in order to see if I would like it better without the faux seam, I undid it on one side. Here’s what I mean.

First, here is a shot of the side “seam.”

To remove it, I first dropped the purl stitch all the way down to the garter rib. (I wasn’t going to undo the seam stitch there because it provides a focal point for the decreases.)

Then, using a crochet hook, I laddered the stitch back up — turning it from a purl stitch to a knit stitch.

Without the seam stitch, the side looks like this:

I liked how that looked better, so before I joined the sleeves and body for the yoke, I undid the seam stitch on the other side as well. Important note: I conducted this experiment before I finished the garter rib on my first sleeve, so I could decide whether or not to add the seam stitch to the sleeve under arm. I wanted the sleeves and body to match, obviously.

A few people have asked me about the yarn I’m using. It’s Rowan’s Felted Tweed Shade Number 152, which they call Watery. It’s a very nice yarn to knit with. I would definitely use it again.

September 4, 2007

From Susan — Just One More Picture…

Filed under: Hemlock Ring,Knitting Tips — lv2knit @ 7:28 am

This picture shows the Hemlock after steaming.  It still does a little of the typical feather and fan ruffling, but it looks much better.

Hemlock012.jpg picture by lv2knit

I may need to make me one of these ;).

And in response to Bonnie and Thomasean: This isn’t a stupid question at all — I just thought it would be too complicated to describe, but here goes!!

When you look at k2tog [ssk] for instance, the sts that are actually crossed are from the row BELOW the action of knitting the 2 tog [ssk].  On the row when you k2tog or ssk, the crossed sts will appear right below the needle.  The st on the needle is a normal looking st.  If you worked a k2tog [ssk] and counted the first plain st above the “crossed” stitches and the row on the needle, you would be counting an extra row of plain knitting because the first st was “zero” — it was created when the sts were decreased.

With a yarnover, there is not a st on the row before because you are essentially creating a new st with the running thread between two sts.  On the row when you make a yarnover, all you see is a hole with the running thread carried over the needle.  The first row worked after a yarnover is the first real st created and so there is no “zero” row as described above.

Whew — my brain hurts!

« Newer PostsOlder Posts »

Powered by WordPress